Home

You’re Doing That Wrong is a journal of various successes and failures by Dan Sturm.

Open Website on Mac Workflow

Update – 2018-01-05

Over at Six Colors, Jason Snell has created a much smarter, safer version of this whole iOS to Mac automation idea.

His version, smartly, builds the shell script on the Mac side — only receiving keywords and URLs from the iOS device — as opposed to my version which is set up to just immediately run whatever text file shell script happens to pop up in my Dropbox folder. A less-than-ideal setup should someone else acquire access to that Dropbox folder. Go check it out.


This may be one of the laziest automation tools I've ever created, but I solves an annoyance that's been bugging me for a long while now.

Often times I'll be looking at a website on my iPhone and I'll want to switch over to viewing it on my Mac. "That's why Apple created Handoff," you say. Yes, well, personally I find Handoff to be slow, unreliable, and only half of the solution.

I'm looking at a website on my phone. I want to press a button on my phone and have that website open in Safari on my Mac. I don't want to wait for a dock icon to appear on my Mac. I don't want to try to click on it, quickly, before it disappears. I don't want to look through a list of open iCloud tabs in Safari on my Mac.

I want to tap and have it open.

What I Did

I used everyone's favorite iOS automation tool Workflow.app to create an Application Extension Workflow that grabs the current URL and saves it to a date/time stamped text file in a specific Dropbox folder. It looks like this:


Then, I set up Hazel on my Mac to monitor that folder and, when it sees a new file, run the file with Bash, then throw it in the Trash. Here's what that looks like:

Overly complicated? Probably.

Lazy? Almost certainly.

Does it do the job I wanted it to do? Absolutely.

It takes about 6 seconds from tapping on the Workflow in Safari on my phone to having an open page in Safari on my Mac. That's not exactly fast, but it's no slower than using Handoff. It's also far more reliable and requires less interaction from me.

And, let's not forget, this will work from any distance. There's no Bluetooth range limit like Handoff. Wherever you are, as long as you've got an internet connection, you can use this Workflow to have a website open and waiting for you on your Mac when you get home.

Twitter Advanced Search Keyboard Maestro Macro

I enjoy using Twitter. I do not enjoy using Twitter.com in a web browser.

On occasion, I recall a conversation that I'd like to find again. Twitter provides a pretty great set of search tools at https://twitter.com/search-advanced but, again, the website experience is pretty awful, on the whole.

Lucky for us, the Twitter Advanced Search tools are just a GUI for a pretty straightforward URL scheme. With the help of Keyboard Maestro, we can skip the ugly web search front end and jump right to the results. A much more pleasant experience.

Asterisks

I left out the date search tools because I rarely find them useful and there isn't a great way to recreate them in KM. The only other minor annoyance with the macro is the speed. It pastes the encoded variables into the Safari address bar in chunks, as it processes. I wouldn't call it slow, but it's not as quick as it would be if the entire URL were encoded before being pasted.

Here's where I'd normally put a screenshot of the macro in Keyboard Maestro but, frankly, it's absurdly long so just download it and take a look for yourself.

Using iPhones in Production

Preamble

When talking to people about my work, a fairly frequent question I get asked is if I ever shoot “professional” video on my iPhone. The topic of whether or not one can use a phone for “real” video production is a great way to get people with strong opinions about technology all riled up. So let’s get to it.

When it comes to my own work, the answer to whether or not you can use an iPhone for professional video is “sometimes”. I have in the past, and will continue to use my iPhone as a professional camera. But, it’s in a limited capacity and probably not in the way most people would guess.

In the video I directed for 1Password, the insert shot of my pug, Russell, sitting on a couch was shot on my iPhone 5S in my living room [1]. Last year, for another video I directed, a shot we didn’t get on set was created entirely in CG, combining plates shot on our Arri Alexa Mini, a Nikon D4, and my iPhone 6S.

Nobody noticed, in either instance, because the iPhone footage was used in limited and specific ways. Russell was sitting in front of blown-out windows which might have given away the difference in dynamic range of the iPhone footage, so I replaced the windows with an HDR still image that was also taken on my 5S. In the CG shot, the element that was shot on the iPhone was not the center of attention and passed by quickly, without scrutiny.

Gear

A key aspect of shooting usable video on an iPhone is treating the iPhone like any other professional camera. Recording with an app, like Filmic Pro, that allows for full manual control over the Shutter, Aperture, ISO, and White Balance is essential. As is keeping the frame stable by mounting the phone to a tripod or c-stand with a mount like a Glif (my phone-mounting solution of choice).

You need to light your scene, whether that be with studio lights or natural light. And, possibly the biggest differentiator between professional and amateur video, if your video involves sound, you need to use an external microphone.

Shooting video on a phone is not a costly endeavor, but it does require care and attention to detail.

In Production

Recently, I shot a project wherein my iPhone 6S was the primary and only camera used.

Gasp!” you say. “It’s true,” says I.

The video was for an iOS app that had a video chat component, similar to a FaceTime call. And, while I could have used a Big-Boy Cinema Camera to shoot the actors, simulating the lens and footage characteristics of a front-facing iPhone camera, I took this project as an opportunity to put my phone through its paces on a real set.

In addition to everything we covered in the previous section of this post, there were 2 technical hurdles that needed addressing before it was time to roll cameras.

The first is one that will always, always bite you in the ass if you embark on such an ill-advised endeavor as this: storage space. In the past, when I’ve tried to shoot semi-serious video with my phone, I have, time and again, completely filled up the storage on my phone much faster than predicted. That resulted in the entire production stopping and waiting until I could download the clips onto my laptop, delete them from the phone, and set everything up again. And if you happen to run out of storage space while you’re rolling? Say goodbye to that clip because it’s gone.

The second challenge was how we would monitor the video as we shot. It’s likely that we could have shot with the rear camera on the phone, using the phone’s screen as a monitor, and no one would have known the footage wasn’t from the front facing camera. But, because this was an app demo, and the actors would need to interact with specific points on the screen, they needed to see themselves as we shot.

Two problems that, as it turned out, had a single solution.

The release of iOS 8 and OS X Yosemite added the ability to directly record an iPhone’s screen output in QuickTime when the phone was connected to the laptop via Lightning cable. I had used it to record apps for interface walk-through videos, so why not just open the Camera app and record the image coming from either camera?

And, to sweeten the deal, QuickTime allows you to select different sources for video and audio inputs, so I could record the video from the front facing camera, and audio from my USB microphone, also connected to my MacBook Pro. No need to sync the sound to the image in post.

Separate video and audio sources.

I could buy a 6-foot long Amazon Basics Lightning Cable for $7, set my phone up on a tripod with my Glif, set my microphone up on a mic stand, connect them both to my laptop where I can monitor the image and record clips with QuickTime, and never worry about taking up any space on the phone itself. Problem solved.

Well, almost. Since QuickTime records a live output of exactly what you see on the screen of your phone, that means it also includes the camera interface controls. That just won’t do. Thankfully, Filmic Pro includes a menu option to “tap to hide interface”. So, after I carefully set my focus, shutter, white balance, etc settings, I can hide the app interface and record only the image from the camera.

Side-note: If you’re a tight budget and can’t afford to purchase Filmic Pro, there are dozens of free “Mirror” apps on the App Store whose sole purpose is to show you a feed from your front facing camera with zero interface graphics. You won’t have the manual controls you get from a real video app, but it’ll do in a pinch.

Now, I don’t have to awkwardly fumble with the camera to roll and cut. I can set up shot once and do the rest from behind my Mac. I can record, playback, and discard takes as quickly as any professional video camera.

Do I recommend shooting video like this for non-app-related videos? Not really. But it was exactly what I needed for this particular project with its particular set of limitations. And, besides, I’ve certainly jumped through more hoops building a camera rig than I did with this one.


  1. Fun fact: the phone was taped to a chair because I didn’t have a tripod at the time.  ↩

Nuke: Copy with Expressions

So, here's a thing I made.

I was recently doing some motion graphics work in Nuke, as I do. I had several elements in a shot that I needed to animate-on with the same motion, speed, size, etc.

The graphics were already in their "final" positions, having done a full layout before animating. Now, I just wanted to add an animated Transform to each element. And I wanted to be able to easily adjust them all, together, as I finessed the animation.

But I couldn't just Clone a Transform and paste it into the other branches. The problem being that none of the elements shared the same Anchor Point (Center). If I cloned the Transform, all of the graphics would be scaling from the center of the first element, not their own centers.

I needed a handful of Transforms that were linked by all of their parameters except Center.

So, rather than spending 15 minutes writing and copy/pasting expressions to link all of the various knobs on the Transform nodes, I spent an hour writing a Python tool that will do it with a keyboard shortcut.

def CopyWithExp():
  sourceNode = nuke.selectedNode().name()
  nuke.nodeCopy("%clipboard%")
  nuke.nodePaste("%clipboard%")
  destNode = nuke.selectedNode().name()
  for i in nuke.selectedNodes():
      for j in i.knobs():
          i[j].setExpression( sourceNode + '.' + j )
      i['xpos'].setExpression('')
      i['ypos'].setExpression('')
      i['selected'].setExpression('')
      i['channels'].setExpression( sourceNode + '.channels' )


nuke.menu('Nuke').addCommand('Edit/Copy with Expressions', "CopyWithExp()", "^#C")

(This goes in your Menu.py file in your ./nuke directory.)

Now, when I press ⌥+⌘+C, it will duplicate the selected node, and link every knob with an expression. Essentially a DIY Clone, but with the ability to easily "declone" individual parameters by right clicking on the parameter and selecting Set to default.

What's Up With That Extra Junk In The For Loop?

It wouldn't be a homemade tool if it didn't include some hacky code to fix some unexpected results. As it turns out, when you programmatically link every knob from one node to another, you also end up linking the hidden knobs that are not exposed to the user in the GUI. Which is not always good.

In the for loop above, you'll see that, after linking every knob between the old and new nodes, I'm reverting the parameters for xpos, ypos, and selected. These parameters are the x and y position of the node on the node graph, and whether or not the node has been selected.

For obvious reasons, we'd like the ability to select the nodes individually. And, if we don't unlink the x and y positions of the nodes, the new node will be permanently affixed atop the old node. You won't even be able to see the original node. Not super helpful.

I've also "manually" linked the channels knob. For some reason, it was not expression linking correctly on its own. It would end up linked to the channel knob, which is a different thing entirely. So, rather than figuring out why it wasn't working, I lazily fixed it with an extra line of code.

Does It Work With Nodes That Aren't Transform Nodes?

Yes, it does. But you may discover a node that has a parameter that breaks in the duplication, like the channels knob did in the Transforms. If/when you find a broken knob, you can add it to the "whitelist" of parameters at the end of the for loop and so on, and so on.

If you'd like to do some exploring, you can see a full list of the knobs associated with a node by firing up Nuke's Script Editor and running the following command while the node is selected:

for i in nuke.selectedNode().knobs():
    print i

Ugh. Are There Any Other Limitations?

There totally are.

Being that the new nodes created are linked via expressions, copying the nodes into a new Nuke project will result in the same error message one would see copying any expression linked node into a new script. It will complain that it can't find the source node that the expressions are looking for. Even if you copy the source node with the expression linked nodes, it will throw an error, then, when you dismiss the error message, the nodes will work. Nuke.

Also, the nuke.nodeCopy("%clipboard%") and nuke.nodePaste("%clipboard%") commands in the Python script use the system clipboard to duplicate the node. This isn't different than using the normal system copy and paste tools in Nuke, but some of you out there use weird clipboard utilities that do things I can't predict. So. There's not much I can do for you there.

Anyway

This tools comes from a conversation I had with friend-of-the-blog, and my podcast co-host, Joe Steel. I was complaining about this problem (and others) in our Slack channel, and he mentioned that Katana had a Copy with Expressions command that would do what I was asking.

I'm actually surprised this feature isn't already built in to Nuke, but now, thanks to Joe, all of our Expression-Linked Dreams have come true.

My Post-Production Workflow

Over the past three-ish years of working for myself, I've experimented with a number of permutations of my post-production workflow in an attempt to find the smoothest, most flexible path from dailies to delivery. And, while I've been able to settle on a consistent workflow over the past year or so, I would never describe it as smooth or flexible. Each step has technical and creative frustrations that keep me from being satisfied. Still, it's the best frustrating workflow I've put together so far.

Before we get started, I'd like to make it clear that this post is in no way meant to be a "how-to" guide for others to follow. My intention here is to illustrate the absurdly complex method by which I turn ideas into videos, while also holding on to the faint hope that publicly highlighting these pain-points may lead to potential solutions.

The Players

Currently, the high-level flow of applications I use in post-production looks like this:

  1. DaVinci Resolve v12.5 – Dailies
  2. Avid Media Composer v7.0.3 – Offline
  3. Apple Compressor v3.5.3 – Encodes
  4. Nuke Studio / NukeX 10.0v3 – Picture Conform, Online, VFX
  5. DaVinci Resolve v12.5 – Color Correction
  6. Nuke Studio 10.0v3 orAfter Effects CC 2015 – Motion Graphics
  7. Final Cut Pro v7.0.3 – Audio Conform
  8. Soundtrack Pro v3.0.1 – Audio Editing and Mixing
  9. Final Cut Pro v7.0.3 – Final Output
  10. Apple Compressor v3.5.3 – Final Encodes

Digital Negative

The beginning of the post-production pipeline is the camera and format selected for the project. When I have a choice, my preferred camera is the Alexa Mini, shooting UHD (3840x2160) ProRes 4444XQ LogC. At a data rate of 1591 Mb/s, we'll suck up ~716Gb for every hour of footage we shoot.

QuickTime support is more-or-less ubiquitous these days and, while LogC support is somewhat hit-or-miss (more on that later), it's possible to take QuickTime Alexa footage through a post pipeline without ever applying a LUT. And, rather than wasting time extolling the benefits of shooting Log, I'll simply suggest you go read Stu's excellent post over at Prolost full of pragmatic wisdom like:

Log, in its many flavors, is a smart, flexible, and powerful way of storing high dynamic range digital cinema imagery. It’s closer to raw than you might think, and often much easier to work with for results of the same or better quality.

Dailies

As a sensible, rational filmmaker, I create dailies for my offline edit. I do not edit with native camera negative files. While it is fast to AMA-import native files into Avid and just start editing, the time gained is quickly lost, many times over, by the slowdown caused by the massive file sizes of most modern cameras.

When I sit down at my desk after a shoot, I have 2 identical hard drives containing my camera negatives. One drive is transfered to a Drobo for archival, and the other drive is dumped into DaVinci Resolve.

In Resolve, all clips are dropped onto a timeline and, in the case of shooting with Alexa, the built-in Alexa LogC LUT is applied. Jumping straight to the Delivery tab of the application, I load a preset to create 1080p DNxHD 36 MXF files of each clip, careful to maintain the clip's original name.

The resulting MXF files are moved into /Avid MediaFiles/MXF/1 via the Finder. When Avid is launched, the drive is re-indexed and, once in my project, I locate the clips with the Media Tool, and sort them into bins.

Back when MXF support was less widespread and I thought flexibility was more important than hard disk space, I used to create DNxHD 36 QuickTime files as my dailies, rather than MXF files. While it's a perfectly reasonable option with a comparatively quick import time into Avid, it creates 2 copies of my dailies (The MXFs in the Avid MediaFiles folder and the QT files that were imported), as well as adds additional complexity and confusion to conforming and relinking sequences later.

And, before you say "how is it confusing to have just one more copy of your footage", let me remind you that you may be relinking your sequences next week or next year. The fewer potential hurdles you put in your own way, the fewer curse words you'll shout at your former self. If I had the QT dailies as well as the MXF files, which would I archive? Both? Just one? Which one? Skip the headache and render MXF dailies for direct import into Avid.

One "issue" with Resolve's rendering that's worth mentioning. I don't know what I did to the program to make it angry, but when I click "Render", it throws out my timeline pixel aspect ratio settings and starts rendering with the Cinemascope ratio. I have to immediately cancel the render, delete the files it began to create in the Finder, go back to the Edit page, open my project settings, and set the pixel aspect ratio back to square, where it was before I pressed render, then press Render again, and everything will export correctly. This happens every single time I render anything, regardless of project or clip settings.

Update - DaVinci Resolve 12.5.1

During the writing of this post, Blackmagic Design released DaVinci Resolve 12.5.1 which offers a solution to my pixel aspect ratio woes. On the Delivery page, in the Advanced Settings section of the Video output settings, Resolve now has a control for pixel aspect ratio.

Strangely, for me, the pixel aspect ratio still defaults to Cinemascope, despite the project being set to Square, but changing this new setting to Square prior to rendering will actually render files with a Square pixel aspect ratio. I'm no longer required to cancel the render, delete files in the Finder, change the setting on the Edit page, and render again.

Offline Edit

I currently edit my projects in Avid Media Composer 7.0.3. While I also have the option to edit in Premiere Pro CC, Final Cut Pro 7, and DaVinci Resolve, there's still no better editing tool than Media Composer. It's fast, efficient, and accurate.

In fact, the core editing tools in Media Composer, which have remained largely unchanged for decades, are so good that I find very little incentive to upgrade to the current version of the application. Since the introduction of the Smart Tool and the addition of tabbed bins in version 7, I find most new features are nice-to-haves.

I am occasionally envious of some of the newer features in other NLEs but, when it comes to the task of editing, Media Composer just can't be beat. I honestly wish I liked editing in Premiere. The timeline integration with AfterEffects is a fantastic feature I'd love to use but, unfortunately, I find Premiere slow and frustrating to use.

Oddly, Final Cut Pro 7 is still an essential part of my post workflow, just not in the editing phase. We'll get to that.

Reviews

As a brief aside, I will mention one tool I use at many different stages of post-production that you may find useful. Often times, while working on a video, it may be necessary to create a QuickTime file of the work-in-progress.

Long ago, I settled on the encoding settings that I considered the appropriate balance of file size and image quality. Those settings were saved as a Compressor Template.

Remember Compressor? That app that comes with Final Cut Studio for making encodes of things? As it turns out, Compressor can be used from the Command Line in Terminal. Which is, frankly, a terrible idea unless you also use something like Hazel to run the commands in the background while you continue to work on more important things.

I have a handful of folders set up on my computer, each with their own Hazel rule for creating a predetermined file type. When I need, for example, a 1080p H264 file, I export a Same As Source QuickTime file from Avid into the 1080 folder, and Hazel does the rest for me. When the encode is finished, Hazel opens a Finder window, showing me the final file.

Here's what the 1080 Hazel folder rule looks like:

The 1080 folder containing the Same As Source file from Avid is in my Home directory, and the Renders folder for the finished QuickTime file is in my Dropbox folder, making it quick to generate a shareable link to send to whomever.

I have not automated the deletion of the Same As Source file because I may want to create another encode from it (maybe half-rez) or, if it happens to be the final version of the video, I'll want to save the Same As Source file as part of the final project archive.

I do things this way for a couple of reasons. The number-one reason is that exporting a Same As Source QuickTime file from Avid is an order of magnitude faster than exporting an H264 file from Avid. Probably 2 orders of magnitude. Which only matters when you remember that, when Avid is importing and exporting files, the rest of the application is inaccessible. With Compressor and Hazel I can export my file quickly, let it convert in the background, and get back to work while I wait to be presented with that Finder window.

Another major benefit of making encodes this way is that it works with any source application, not just Avid. Just dump a file into the folder and away it goes.

Conforming

Prep

Here's where things start to get ugly. I need to turn my un-color-corrected rough edit full of slap-comps and minimally-viable audio into a final, polished product.

Before leaving Avid, I need to do a few things to prep the sequence for Conform and Online. Step 1 is, of course, duplicating the locked edit and starting with a fresh copy of the timeline. If I haven't already, I create a 1080p H264 QT "reference" file of the locked edit to match against the conformed timeline in Nuke Studio.

Next, I replace any audio that came in attached to the Dailies with the original WAV files from the Sound Recordist. I do this manually, on a new track, so I can verify that the timecode sync sent from the smart slate is identical to the timecode the camera recorded. It's usually off by a frame or two, so I line the originals up via waveform and double check it by listening to playback. Avid's timecode displays on the Viewer windows make it easy to find the starting timecode of a source clip on the timeline and the corresponding in-point on the WAV file. Since I primarily work on sequences under 2 minutes in length, this process only takes 5 or 10 minutes.

The last thing I need is an AAF of my sequence. It includes all video and audio tracks and is named to match the sequence from which it was created.

Note: if the Avid timeline has an abundance of effects applied to clips, often times they will need to be removed before creating the AAF. The AAF format is capable of transferring some basic effects to Nuke Studio, like Transforms, but if any of the clips are stacked or collapsed into a Submaster, the AAF will not transfer the layers within the effect. You must manually pull out each layer onto the main video tracks in order to have them all included in the AAF.

Picture Conform

The freshly minted AAF file is imported into a new project in Nuke Studio. Project settings match the final output; typically 1080p 23.976.

As expected, the sequence shows up with all clips offline. Annoyingly, none of the audio tracks are imported because Nuke Studio does not support importing audio via AAF. It does support the manual addition of audio tracks and basic audio editing tools (similar to its video editing tools) so I have no idea why audio is excluded. It is maddening and, frankly, unacceptable for an application that costs nearly $10,000.

The reference QuickTime file is imported below the other video tracks, then the sequence is relinked to the original UHD camera negative files, adjusted visually using Nuke Studio's wipe and difference viewer tools for any sync issues that may have occurred, and scaled and/or cropped to fit the appropriate raster and letterbox sizes.

VFX

To save us all a lot of time, I'll leave out the if/then/while loop of steps one has to go through when creating the complex export structures required to send individual shots to NukeX for VFX work and have them return to the timeline layer above their original plate (The Hiero portion of Nuke Studio). A task for which Nuke Studio is specifically designed and a task at which it fails to perform correctly 3 out of 5 times.

The shots that need VFX work are selected and exported into Nuke scripts with 12 frame handles. The work is completed, the shots are rendered as EXR sequences, and the renders are imported back into the timeline on a new video track, either automatically or via Nuke Studio's Build Track tool. Since most projects are shot on Alexa, and not all shots require VFX work, the EXR sequences are rendered with Alexa LogC colorspace so everything in the final timeline uses the same settings.

Rendering the EXR sequences with the Alexa LUT is important for more than just consistency. Alexa LogC footage requires a LUT be applied to linearize the footage for VFX work, and a second LUT to preview the linearized footage in a "monitor-space" environment. Which is to say, even after you've removed the Log gamma curve from the footage, you need to tone-map the footage to bring the white-point down to 1.0.

This 2-step process in Nuke is often a 1-step process in other applications like, say, Resolve. Resolve uses a single 3D LUT to linearize and preview LogC footage so, if your EXR sequences are rendered with a linear gamma (the default for EXR sequences), they will look very very wrong with the Resolve Alexa LUT applied.

It's also worth noting that, while Nuke comes with the "linearizing" LUT for Alexa footage pre-installed, users need to download the viewer LUT from Arri's website and manually install it in their menu.py file with python scripting.

Additionally, since Nuke Studio is the awkward love-child of Hiero and Nuke, it contains two separate viewers; one for the Timeline and one for the Node Graph. So, installing the Alexa viewer LUT for use in the Node Graph viewer does not install the LUT in the Timeline viewer.

The Timeline Viewer gamma controls.

The Node Graph Viewer gamma controls.

Personally, I've only installed the LUT for the Node Graph viewer because:

  1. Compositing is the most important place to maintain proper color management.
  2. I know how to install it in the Node Graph viewer because it's the "Nuke" half of the application and Hiero is more difficult to customize.
  3. It was a pain in the ass to do it once and I don't feel like doing it a second time.

The unfortunate result is that my footage looks different in the Node Graph viewer and the Timeline viewer. Which sucks, but since I'm not doing any color work in the Timeline, and I made sure my footage was properly color-managed when I was doing the compositing work in the Node Graph, I know it'll look right when I move everything to Resolve.

Color Correction

When the VFX work is complete and the sequence is ready to be color corrected, I export an XML of the timeline from Nuke Studio. Why an XML instead of an AAF like the one I exported from Avid? Because, while Nuke Studio is capable of importing AAF, XML, and EDL files, it's only able to create XML and EDL files.

No, I don't know why.

And, since Avid can only create AAF and EDL files, I have to use 2 separate "professional file interchange formats" in my workflow. Makes total sense.

EDL is out of the question because it's the oldest of all exchange formats, with the fewest features, and a separate EDL has to be created for every video track in a given timeline. No thank you.

Resolve typically imports and relinks the XML without any issues. It does, however, fail to recognize that the EXR sequences have handles, so the vfx shots need to be slipped 12 frames in the timeline before proceeding to color correction.

A Question for the Audience

Being that all of our footage is Alexa LogC footage, at some point, as part of the color correction process, we should be using Resolve's built-in 3D Alexa LUT to linearize the footage and convert it to monitor-space. But, if you recall from earlier, Resolve doesn't separate the linearization LUT from the viewer LUT like Nuke does. So the question is do we apply the LUT to the clips in the Media page before color correcting, or as a Node on the Color page? Should it be the first or last Node on a Shot? Or added to the Timeline so all clips can be corrected with one global Node? Some of those options affect preview thumbnails in the app. Does that bother you?

Clearly, I'm not sure of the correct answer. I've found that, no matter which option I choose, the results are questionable.

Ideally, we would linearize the footage prior to performing any color transformations so our math is correct, then we'd use a viewer LUT to view the tone mapped image in monitor-space. Just like Nuke does. But, again, we don't have those kind of tools in Resolve (by default). This is not simply an issue of semantics. While it's possible to arrive at the same final image, regardless of the order in which you add the LUT, getting it backwards will adversely affect the experience of using the color correction tools.

Adding the LUT before color correcting makes the Color Wheel tools in Resolve sensitive to the point that small color changes are near impossible. Which is understandable when you think about it. The wheels are expecting an input image with linear values across a certain range. When the values are compressed with an inverse-Log gamma curve, they will not change as you'd expect them to when you move the color wheel.

And this goes for almost any color space in any color correction tool. If you've ever had the experience of dragging a color wheel or slider and seen the image change much more dramatically than you expected, chances are the color tool was expecting a different gamma or color space than the image being fed into it.

Which is why, while a pain in the ass to use, the 2-step process of linearizing Alexa footage in Nuke is necessary to apply mathematical operations correctly. It's too bad Nuke's color correction tools are a bigger disaster than Resovle's LUT issues.

Regardless, this issue is the reason I was hesitant for a long time to make Resolve my primary color correction application. It has a (mostly) fixed UI and I found the small size of the color wheels and sliders frustrating to manage with a mouse or Wacom pen. But my frustration was due almost entirely to the sensitivity created by using incorrect LUT settings on my clips. When clips are correctly color managed, Resolve's color tools are much easier to use. Not great, but easier.

This is why, up until this year, I color corrected my projects in After Effects with Red Giant Colorista. I love Colorista. Love it. Its color wheels are dampened for smooth adjustments and include fast, easy to use tools for HSL adjustments that are a dream to work with. The reasons I went in search of a dedicated color correction application like Resolve had nothing to do with Colorista's toolset, and everything to do with my frustrations with After Effects.

Back to Color Correction

Assuming we've struggled our way through the LUT and interface difficulties and created a color corrected image we're happy with, the next step is to export the clips.

Depending on the project, this step will vary. If all work on the "picture" portion of the video is now complete, a single 1080p ProRes 4444 QuickTime file will be rendered of the entire sequence.

If the project requires Motion Graphics work that I either couldn't, or didn't want to create in during the VFX stage, each shot will be rendered as a separate ProRes 4444 QuickTime file.

The clips are rendered into their own subfolder, with their original names plus some sort of modifier appended to the filename, indicating they are the color corrected versions of the clip (typically _CC). As long as the names are consistent, they're easily relinked to an XML with Nuke Studio's bevy of conforming tools.

Motion Graphics

Assuming this is a project that needs Motion Graphics work, the individually-rendered shots are re-conformed into a sequence in one of two possible applications.

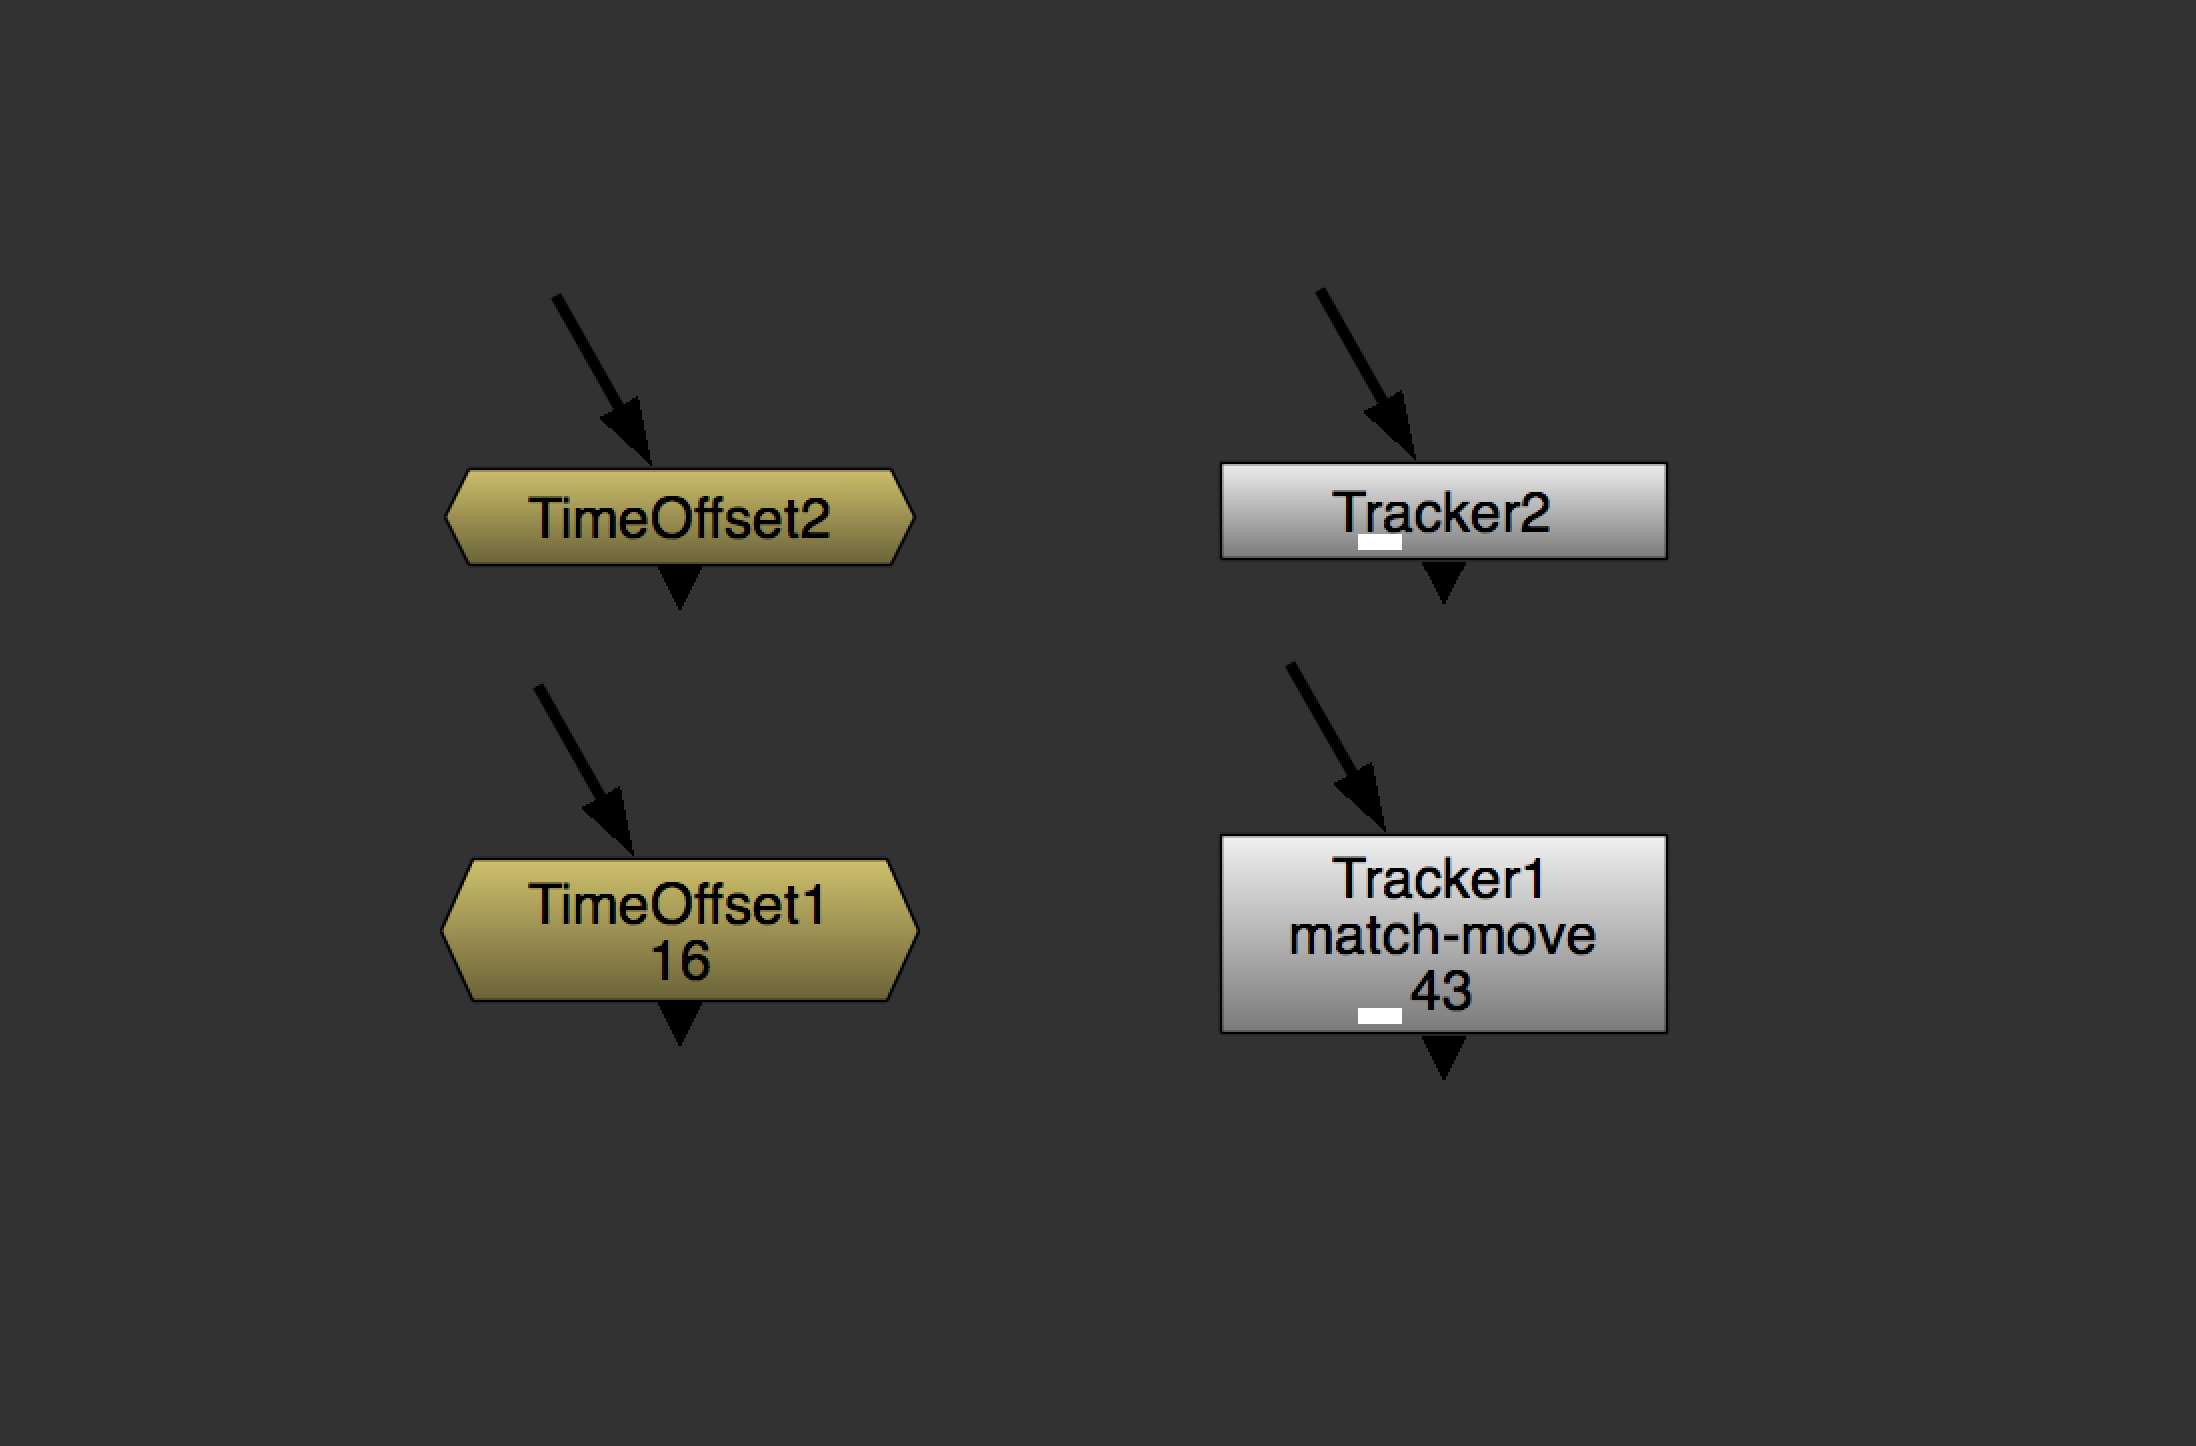
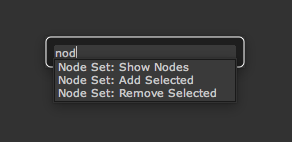
If I can do the work in Nuke, I will. Nuke isn't necessarily built for motion graphics, but it is my app of choice for most tasks. And, with the addition of my Node Sets gizmos, it's not as difficult to coordinate complex animations as it once was. The color-corrected QuickTimes are conformed back into Nuke Studio with the Build Track tool, and work begins, similar to VFX phase of post.

There are, however, certain motion graphics tasks that are better suited to being completed in After Effects (read: anything to do with text). In which case the XML that was previously imported into Resolve is imported into After Effects using the Pro Import After Effects option, formerly known as Automatic Duck. The sequence comes in offline, and each clip is manually relinked to the corresponding color-corrected file.

Yes, I could conform the color-corrected plates back into Nuke Studio and generate a new XML that references the color-corrected plates in order to save myself the hassle of manually relinking incorrectly named clips in AE but, more often than not, that method fails to reconnect all clips and manual relinking is needed anyway so I save myself some time and go straight to manually relinking.

I've also experimented with importing and relinking the XML in Premiere, thinking the NLE would have better luck relinking the clips than the compositing application, in which case I could use Send to After Effects to get it into AE. More complexity, more idiosyncrasies, more failures, more time wasted.

Once motion graphics work is completed, our picture should be locked. A single ProRes 4444 QuickTime file is rendered of the final timeline. This is one instance where I prefer to be working in After Effects. Though AE's renderer can be slow and is not without the occasional glitch, its stability and speed are miles ahead of Nuke Studio, especially with regard to QuickTime files.

By my estimation, the number of successful QuickTime renders I've created with Nuke Studio is likely a single digit percentage. And the time taken to perform the render is somewhere between 2x and 10x the amount of time of other applications.

I recently tried to use Nuke Studio to create dailies instead of using Resolve. The estimated time to create ~20 minutes of dailies was 12 hours and the render failed on the first clip. Resolve knocked out the render on the first try (after correcting the pixel aspect ratio) in less than 30 minutes.

Have I mentioned that Resolve is free and Nuke Studio costs $10,000. I think it's worth mentioning again. Resolve is free and Nuke Studio costs $10,000.

Sound

With picture locked and rendered, now it's time to work on sound. Our original AAF file from Avid is imported into Final Cut Pro 7 with Automatic Duck. Yes, just like FCP 7 itself, the Automatic Duck plugin still works.

The sequence that comes in is our offline edit, but with the original WAV files I manually conformed in Avid prior to the AAF export. The ProRes 4444 file of our finished picture is imported and lined up with the offline timeline. Once aligned, all the offline video tracks are deleted, leaving just the final picture file and the offline audio. Using Reconnect Media, all audio clips are relinked to their original files.

A Quick Sidebar

One hiccup I frequently run into is the naming convention used by whatever audio recorder my sound recordist uses on set. The CF card he hands me on set is full of WAV files with names like 12T03. That is, Scene 12, Take 3. For some reason, the metadata for that file is named 12/03. I assume the / isn't in the file name because whatever file system the recorder is using doesn't play nicely with having a forward-slash in the name.

While I'm sure there's probably a way to have the recorder use the same file name in both places, what this issue requires of me in post is that I batch rename a copy of the original sound files, replacing the T with the / that FCP is searching for. For this task I use Name Mangler, but it could just as easily be done with OS X's batch renaming tools.

Once the files are renamed, Reconnect Media in FCP 7 will now find and relink my files. Next, all audio clips are selected and sent to Soundtrack Pro with the Send to Soundtrack Pro Multitrack Project option.

Once in Soundtrack Pro, I edit, mix, and adjust my audio. I've been using Soundtrack Pro for years. I use it every time I edit an episode of Defocused, so I'm very comfortable and quick with its tools. Some day, when Soundtrack Pro inevitably breaks due to an OS update, I'll likely move to Logic Pro. But, as it stands, this old app does everything I need it to do and it does it quickly.

When work is completed, I export an AIFF file of the timeline and import it back into my FCP 7 project. I duplicate the sequence, keep the final picture, delete all the offline audio, and replace it with my final AIFF audio.

I now have a timeline with a single video track containing the finished picture, and a single audio track containing the finished sound. In some instances I'll end up with 2 audio tracks; one for music, one for everything else, but it's rare.

Final Exports

From the final timeline, a Same As Source QT file is exported to my 1080 folder and the final client encode is created. The Same As Source (ProRes 4444) file and the H264 file are saved together in the project directory.

Revisions

Sometimes, despite our best efforts, revisions need to be made after a "final" file has been delivered. In those instances, I will back up to the part of the process that needs updating, and the individual shot will be taken through the remaining steps by itself.

Once that shot has been updated, it will be placed on a second video track in the final FCP 7 timeline, above the previous clip. From there a new "final" encode will be made.

Since this step is almost always reserved for the last 1 or 2 shots that just need a small tweak, I've never found that the "final" timeline gets too cluttered with single shot revisions. If more than a couple shots need adjusting, the whole timeline goes back through the process with a new version number.

There is Too Much, Let Me Sum Up

Now that we're past the "how it's done" portion of this blog post, let's delve into some opinions.

Avid Media Composer

As I mentioned above, I still think Avid Media Composer is the best tool for editing. Every time I attempt to stray from it, trying something new, I always find myself rushing back to that ugly, antiquated interface that just gets the job done better than the competition.

That said, there are many parts of Media Composer that suffer badly from Avid's "if it ain't broke don't fix it" approach to software evolution. The effects system is stuck in the 1990s and complex animation is best left to other applications. The color correction tools are laughable. The lack of sub-frame audio adjustment confounds me. And things like the 0-255 or 16-235 color ranges, and crop/pad/resize import options, make the application feel like it was built for technicians, not artists.

I could go on, but since most of my complaints are the same complaints we've all had for many years, I'm sure you've heard them all before.

Nuke Studio

Nuke Studio's relinking and conforming tools are easily some of the best and most powerful tools in any application I've used. The timecode and metadata adjustments that can be made in the Spreadsheet tool are basically magic.

The problem with Nuke Studio is really that it's an application full of incredible tools that don't inter-operate with each other in a coherent or successful manner. The current paradigm of the separate Hiero Timeline and Nuke Node Graph is so confusing and broken that I wonder how anyone who wasn't previously using the individual applications could ever understand this impossibly complex, monstrous application.

Even when using the application exactly as intended, I often run into strange edge-cases that create unexpected results. And, for an application that creates and manages numerous, connected files on your hard-disk, with the idea that they'll be distributed to artists on a team, often times backing up and trying again when you encounter an issue is more of a hassle than just pressing on with whatever unusual Nuke script was created when you clicked "Create Comp".

Recently on a project, each of my Nuke scripts had 30 crop nodes after each Read node (one for each clip in the timeline). Only 1 was turned on and active, and the output was correct, so why bother figuring out what caused it? Just shake your head at the expensive application and move on.

Still, NukeX remains the best compositing platform on the market. And, in spite its issues, Nuke Studio does things that no other application I'm aware of can do. The conforming tools, the versioning tools, the roundtripping through vfx back to the timeline. All incredible features that are so great to have at your disposal if/when they work correctly.

AAF/XML/EDL Support and Interoperability

The appeal of Nuke Studio is the promise of seamlessly connecting an editorial timeline to powerful visual effects and color correction tools and applications. But we've had successful post-production pipelines before the creation of Nuke Studio, made possible by the interchange of data via EDL, XML, and AAF files. These files are intended to be an open source, universal language understood by video and audio applications.

In practice, support for these formats is frequently incomplete. I mentioned Nuke Studio's confounding lack of audio import support, but the one that really gets me is the exchange of basic effects. At some point, support for recognizing effects in AAF files was added to Nuke Studio.

Transforms usually come in correctly. Dissolves are usually deleted in favor of creating them again in NukeX because the Nuke Studio timeline doesn't honor clip transparencies by default, creating confusing results when dissolves are added to video tracks above V1. Nearly all other effects in the AAF file are ignored.

Specifics aside, there's no real way to know what pieces will and won't be reorganized by a given application in your pipeline. And most applications won't let you know there were additional effects in the file it was unable to interpret. Which is why that QuickTime reference export of the locked offline edit is so important. All we can really count on is that a basic sequence of clips will move from one application's timeline to another.

While I don't expect complete compatibility of files between competing applications, I find the current state of exchange tools and formats hugely disappointing.

GPU Acceleration and Other Ways to Ruin Your Day

Hands down, my most frustrating daily obstacle is the GPU in my Early 2013 Retina MacBook Pro. That's right, I do all of this work on a laptop connected to 2 additional external monitors. I love the portability and flexibility of this setup.

But with every software update of Nuke or After Effects or Resolve, more tools within the applications are being "accelerated" by offloading their processing to the GPU. In Nuke, I have the ability to override that acceleration and tell the application to process the effects on the CPU. In Resolve, I do not.

And the result is, depending on the type of footage I'm working with, I'll launch Resolve, open my project, and immediately be presented with a dialogue box telling me my GPU memory is full. If I dismiss the message and attempt to do any work, even something as simple as scrubbing the editorial timeline, my computer will instantly lockup and kernel panic.

The only solution, when presented with this dialogue, is to immediately quit the application, and perform a full reboot of the computer to purge all GPU memory. Not much of a solution. And even then, medium-sized Resolve projects using inter-frame compressed video formats are able to max out the GPU with zero other applications competing for memory.

In all seriousness, the best solution to this problem is to buy a bigger, more expensive computer.

And Finally

At the end of the day, I don't feel great about my post-production workflow. I spend way too much time thinking to myself "there's got to be a better way to do this". And I'll continue to spend too much time thinking that until I find a new, less bad solution.

Or until my frustrations grow large enough to make me start my own software company and build the tools I've been desperately searching for. There's a reason so much of this site is dedicated to custom Gizmos and Python scripts. I continue to be unsatisfied with the tools I use to do my job.

Though, knowing the person I am, I'm not sure I'll ever entirely rid myself of that feeling.

Nuke Gizmo Icons

I found myself with some spare time this weekend, so rather than do something constructive, I decided to make some icons for my various Nuke gizmos and tools. Because a gizmo isn't a real gizmo until it has an icon.

To add icons to your gizmos in Nuke, you just drop a 24x24 pixel png into your .nuke folder and add icon='filename.png' to that gizmo's .addCommand in your menu.py file. For reference, here are my updated NodeSet Tools' .addCommand lines:

toolbar = nuke.menu("Nodes")
nsets = toolbar.addMenu("Node Sets", icon='NodeSetsMenu-show.png')
nsets.addCommand('Node Set: Show Nodes', 'showOnlyChosenNodes()', icon='NodeSetsMenu-show.png')
nsets.addCommand('Node Set: Add Selected', 'labelNodes()', icon='NodeSetsAdd2.png')
nsets.addCommand('Node Set: Remove Selected', 'unLabelNodes()', icon='NodeSetsSub2.png')

If you would also like to fancy-up your gizmos, hit the download link below, drop all the png files into your .nuke folder, and adjust your menu.py file accordingly.

For the FrameHold_DS gizmo, I cheated and stole the standard FrameHold icon from inside the Nuke application folder which, if you're curious, is located in Contents>MacOS>plugins>icons within the Show Package Contents of Nuke.app (Not the X or Studio variants). Again, just copy the png into your .nuke folder, and add it to the gizmo code.

Extras

Keen observers may notice a few extra gizmos in my menu that I haven't yet discussed on this site. While not all of them are ready for primetime, the two dead-simple gizmos I've recently found surprisingly useful are the Compare Side by Side and Compare Vertically gizmos. There's literally no way you'll ever guess what they do, so you'll just have to download them to find out.

They, too, go in your .nuke folder and are added to the Gizmos menu with the following menu.py lines:

toolbar = nuke.menu("Nodes")
gzmos = toolbar.addMenu("Gizmos", icon='Gizmos4.png')
gzmos.addCommand("Compare Side by Side", "nuke.createNode('compare_side')", icon='sideby.png')
gzmos.addCommand("Compare Vertically", "nuke.createNode('compare_vert')", icon='vert.png')

Downloads

Real RoundRects in Nuke

I ended my previous post about creating RoundRects in Nuke with this line:

Fingers crossed that The Foundry will render this gizmo obsolete sooner rather than later…

Though it wasn’t The Foundry that came to the rescue, I didn’t have to keep my fingers crossed long. Thanks to Erwan Leroy, we now have a real RoundRect tool worth using.

What Was So Bad About My Version?

I’m glad you asked. Technically, nothing, since the tool did work, but, beyond the limitations I outlined in the previous post, my RoundRect tool was exceptionally complicated under the hood.

The internals of my RoundRect gizmo.

It was built from 6 basic shapes; four circles and two rectangles [1]. Combining all the pieces required 31 nodes, expression linked to play nicely together. Sure, the nodes were hidden under the surface of the gizmo interface, but a simplified tool will always be more efficient and easier to debug should you run into a problem while working.

Erwan’s tool is built from a single Roto node. It also uses a Transform node, but the tool isn’t connected to the input or output of the gizmo; it exists solely to make the creation of the gizmo interface easier and less prone to situational malfunctions.

From Erwan’s post:

The reason why I added a transform instead of picking directly the roto node's knobs, is that the roto knobs are sensitive to what is selected within the node. I kept getting greyed out knobs, so I decided to get around the issue this way.

The internals of Erwan's RoundRect gizmo.

The Magical Part

The reason I built a gizmo in the first place was to have a procedurally drawn RoundRect, absent from the human error inherent in dragging tangent handles with GUI controls. In my mind, the way to avoid these problems was to use simple shapes and assemble the RoundRect piece by piece. Which caused me to discount the use of Bezier shapes.

Being much smarter than I am, Erwan recognized that each point and tangent handle on a roto shape is scriptable. So, by manually drawing the eight points required to create a RoundRect, then adding expressions to each point, ensuring they were positioned and curved properly, he was able to create a perfect, procedurally drawn RoundRect with a single Bezier path in a single Roto node. If you haven’t clicked the link yet, go check out how he did it.

The expressions on the Bezier points.

Thank You

Thank you, Erwan, for building and sharing this tool. At this point, I don’t care if The Foundry ever adds native RoundRect support. This tool is what I’ll be using from now on.


  1. Well, technically only three shapes; the two rectangles, and four copies of a single circle. This, by the way, is one of the major benefits of node based compositing, if you’re still on the fence about the whole layers vs nodes thing.  ↩

RoundRect Gizmo for Nuke

I love RoundRects. They're great for motion design, or building mattes for all our favorite Apple devices.

A lot of design applications include tools specifically for creating RoundRects because, frankly, creating them from scratch is neither quick nor pleasant. But, since I do most of my design work in Nuke, the lack of easily-created RoundRects is a major pain point for me. So, like most of the tools and scripts on this site, while I wait for The Foundry to give us a proper RoundRect tool, I decided to build one myself.

The properties pane.

The most important part of any RoundRect tool is the ability to quickly and easily adjust the radius of the shape's corners. The Corner slider on my gizmo has a range from 0 (a square) to 2 (a circle), allowing me to dial in exactly the radius I need. The next thing it needed was the ability to make non-square RoundRects. The Width and Height sliders take care of just that.

Aside from the Size slider, I could have stopped there, but I figured I'd make it a bit more flexible and friendly while I was at it. Checkboxes give it the ability to be used as an alpha channel and, optionally, replace the existing alpha channel. The color slider is there for transparency adjustments and, of course, color.

Limitations

The standard transform controls are a no-brainer, but you will notice the lack of one particular transform parameter in the properties pane: scale.

The way this (hacky) gizmo is built, scaling must be done with the Size slider. Which means, despite the ability to grab the scale ring on the transform handle, don't. Scaling with the transform handle does not maintain resolution and edge quality when scaling up.

Fingers crossed that The Foundry will render this gizmo obsolete sooner rather than later, but, until then, happy RoundRect-ing.

Customizing Native Nuke Nodes with addOnCreate

As much as I enjoy building custom gizmos to make my work in Nuke more enjoyable, they're really no replacement for native nodes that (hopefully, eventually) include the tweaked feature that I want.

In fact, trying to use a custom gizmo as a replacement for a native node can add friction since I end up with two results in my tab+search window rather than one. When trying to use my beloved FrameHold gizmo, I end up adding the old, dumb, native FrameHold node about half of the time. It's partly because there are two FrameHold nodes in my results, and partly because my custom gizmo shows up lower in the search results than than the native node. Sure, I could rename my gizmo to something unique to avoid ambiguity in the search, but that would come at the cost of precious muscle memory.

framehold tab search.png

But, thanks to an email from reader Patrick, I've recently become aware of the addOnCreate command in Nuke's Python API. Essentially, addOnCreate allows you to define a function to be run whenever a given Class of node is added, opening the door to customizing the native Nuke nodes as they're added to your script.

As a quick test, I used addOnCreate to add some TCL code to the labels of my TimeOffset and Tracker nodes.

# Time Offset Label Modification

def OnTimeOffsetCreate():
  nTO = nuke.thisNode()
  if nTO != None:
    label = nTO['label'].value()
    nTO['label'].setValue('[value time_offset]')

# Tracker Label Modification

def OnTrackerCreate():
  nTR = nuke.thisNode()
  if nTR != None:
    label = nTR['label'].value()
    nTR['label'].setValue('[value transform]\n[value reference_frame]')

# Add the custom labels to newly created nodes

nuke.addOnCreate(OnTimeOffsetCreate, nodeClass="TimeOffset")
nuke.addOnCreate(OnTrackerCreate, nodeClass="Tracker4")

(code only)

I've long been a fan of using the label of my TimeOffset nodes to show me how many frames have been offset. Especially handy for my kind of work, where a single animated element can be reused dozens times, offset in time, and randomized to make large animations easier to create and manage. For Tracker nodes, it's important to keep track of both the Reference Frame used, as well as the type of Transform being applied. Now, every time I add a TimeOffset or Tracker node, the additional information is automatically added to my node label.

Nuke default nodes on top. With custom labels below.

Nuke default nodes on top. With custom labels below.

As expected, there are limits to what you can modify with the Python API but, henceforth, this method of interface customization is going to be my preference, resorting to creating gizmos as a fall-back when I run into a limitation. The thought of dropping a single Menu.py file into my local .nuke directory, and having all my Nuke customizations show up, is incredibly appealing to me.

Node Sets for Nuke v1.1

Since creating the Node Sets for Nuke toolset back in June, I've been using it like crazy on all of my projects. Which has led to the discovery of one incredibly obnoxious bug.

This little guy is the maxPanels property at the top of the Properties Pane:

maxPanels.png

This is where you set the maximum number of node properties panels that can be open simultaneously. I usually keep mine set to 3 or 4. When I open a node's properties panel, if I already have the maximum number of panels open, the oldest panel, at the bottom of the list, is closed and the new panel opens on top. Which is great.

Unless, of course, you're trying to simultaneously open an unknown number of properties panels, all at the same time.

When using the Node Sets tool for showing all nodes in a set, I would have to manually set the maxPanels number to a value greater than or equal to the number of nodes I'd already tagged, prior to running the command. Since I usually have no idea how many nodes are in a set, I end up setting the maxPanels property to something I know is way too high, like 35. That way, when the Show Nodes in Set function runs, I won't be left looking at only 3 of my tagged nodes.

But since the Show Nodes in Set command is already searching through all the nodes to see which ones are tagged, wouldn't it be great if it could keep a tally as it searches and automatically update the maxPanels property to match?

Yes. That would be nice.

# Node Sets for Nuke v1.1

# This function opens the control panels of
# all the nodes with "inNodeSet" on their label

def showOnlyChosenNodes():
  names = []
  li = []
  for node in nuke.allNodes():
    if "inNodeSet" in node['label'].value():
      names.extend([node.name()])
      li.extend([node])
  numPan = nuke.toNode('preferences')['maxPanels']
  numPan.setValue(len(names))
  for i in range(len(li)):
    node = li[i]
    node.showControlPanel()

# This function adds "inNodeSet" to a
# new line on the label of all the selected nodes

def labelNodes():
  for node in nuke.selectedNodes():
    label = node['label'].value()
    if 'inNodeSet' not in label:
      node['label'].setValue( label +  '\ninNodeSet')


# and this one clears the label of
# all the selected nodes

def unLabelNodes():
  for node in nuke.selectedNodes():
    label = node['label'].value()
    if 'inNodeSet' in label:
      node['label'].setValue( label.replace('\ninNodeSet','') )


toolbar = nuke.menu("Nodes")
nsets = toolbar.addMenu("Node Sets")
nsets.addCommand('Node Set: Show Nodes', 'showOnlyChosenNodes()')
nsets.addCommand('Node Set: Add Selected', 'labelNodes()')
nsets.addCommand('Node Set: Remove Selected', 'unLabelNodes()')

In addition to updating the showOnlyChosenNodes() function, I've also renamed the actual menu commands to all start with Node Set:. This way, I can start a tab+search with the same three letters, nod, and quickly narrow results to the only 3 tools that fit that criteria; my Node Set tools.

node sets tab search

I love using Node Sets in Nuke and I'm glad to finally be rid of this annoying workaround.

iOS Spinner Gizmo for Nuke

Throughout the course of my work, I end up rebuilding and animating a lot of app interfaces. One of the most common pieces of the iOS interfaces I create is the "thinking" spinner.

It's one of those things that I almost always need, and typically forget about until I need one. Which usually results in me grabbing a screenshot of a spinner from the app and animating it to rotate. Which is not actually what it does [1].

Since I like to use my free time between projects to automate repetitive tasks, I built a Nuke Gizmo to take care of this in the future.

Default Spinner

Default Spinner

Dark Mode Spinner

Dark Mode Spinner

In order to make it useful in almost any situation, I made the spinner gigantic. It's built on a 1024x1024 Constant. It's got alpha and it's premultiplied, ready to go. It makes a full revolution in exactly 1 second [2].

Spinner Node Graph

The exposed controls are exceedingly basic. It has Transform, Scale, and Dark Mode controls. The default spinner is white on a semi-transparent black round-rect. Dark Mode switches it to a black spinner with no round-rect backdrop; typically used on mostly-white interface images.

I'm going to get a ton of use out of this little thing and, if you think you will too, hit the download link below. Drop the gizmo file into your .nuke directory and add the following to the bottom of your Menu.py file:

toolbar = nuke.menu("Nodes")
gzmos = toolbar.addMenu("Gizmos")
gzmos.addCommand("iOS Spinner", "nuke.createNode('iOS-spinner')")

Download: iOS-spinner.gizmo


  1. I animate them with an expression, not keyframes. I’m not an animal.  ↩

  2. Not the absurdly slow speed your browser is displaying the GIFs.  ↩

Automated Viewer Frame Handles in Nuke

When working on a VFX shot, more often than not, the plate's image sequence will include frame handles; an additional 8 or 12 frames at the start and end of the shot. The extra half or third of a second at the ends of the shot give us the flexibility to adjust in and out points later without having to come back to our compositing application and re-render the shot with a new frame range. Which is great.

But, when working on a shot in, say, Nuke, you'll often want to play back the shot without viewing the currently-extraneous frames. Lucky for us, Nuke has a these fun little red triangles on its timeline that you can drag around to set custom in and out points as you see fit. It's a great feature for focusing on a smaller range of frames for a specific task.

But, if you're trying to see eactly the frames that are currently in the edit, and only those frames, dragging around tiny red triangles isn't terribly precise. And the other option, typing in the first frame plus the handle, a hyphen, then the last frame minus the handle, is slow and requires math (yuck).

This being a well-defined, menial, and repetitive task, it's a perfect candidate for automation. With help, again, from my good friend Jake at The Foundry Support, I've added two new items to the bottom of my Viewer menu.

Now, all it takes is a single click (or keyboard shortcut, if you're so inclined) to quickly add 12 or 8 frame handles to my Viewer Timeline Range.

Here's the code to add to your Menu.py file in your .nuke folder:

def newViewerRange12():
  # Get the node that is the current viewer
  v = nuke.activeViewer().node()
  # Get the first and last frames from the project settings
  firstFrame = nuke.Root()['first_frame'].value()
  lastFrame = nuke.Root()['last_frame'].value()
  # get a string for the new range and set this on the viewer
  newRange = str(int(firstFrame)+12) + '-' + str(int(lastFrame) - 12)
  v['frame_range_lock'].setValue(True)
  v['frame_range'].setValue(newRange)


def newViewerRange8():
  # Get the node that is the current viewer
  v = nuke.activeViewer().node()
  # Get the first and last frames from the project settings
  firstFrame = nuke.Root()['first_frame'].value()
  lastFrame = nuke.Root()['last_frame'].value()
  # get a string for the new range and set this on the viewer
  newRange = str(int(firstFrame)+8) + '-' + str(int(lastFrame) - 8)
  v['frame_range_lock'].setValue(True)
  v['frame_range'].setValue(newRange)

# Add the commands to the Viewer Menu
nuke.menu('Nuke').addCommand('Viewer/Viewer Handles - 12f',
"newViewerRange12()")
nuke.menu('Nuke').addCommand('Viewer/Viewer Handles - 8f',
"newViewerRange8()")

Naturally, if you only ever deal with one duration for your frame handles, you can add just one of the functions, but I like having the flexibility of both options.

That Jake, he sure is good with the Python code, isn't he?

Update - 2014-10-25

The release of Nuke 9 is just around the corner and its revamped Viewer interface brings with it a small bug in my Viewer Frame Handles code (allegedly).

Design decisions in Nuke's new big brother, Nuke Studio, have made their way into the standalone app (reportedly) and now require the Frame Range Lock to be set before the new Frame Range is defined (or so I hear). Keen observers will notice that the last 2 lines of the newViewerRange functions above have been swapped to reflect this change.

According to a friend who's not me, the old code will still work in Nuke 9, but requires you to have existing In and Out points prior to running the command or run the command twice.

If you're planning on using this tool with Nuke 9 and Nuke Studio, you should update your Menu.py file now. The updated code will run properly in both Nuke 8 and Nuke 9 (so the story goes).

A Better FrameHold for Nuke

Update: March 22, 2021

This gizmo is broken in Nuke 13, but it's okay! After almost 7 years (yikes), Nuke has added this feature to its native FrameHold node.


The FrameHold node in Nuke is one of my most commonly used tools when doing Roto/Paint/Clean-Up VFX work. When I'm creating patches to replace objects I've removed, I scrub through the sequence, looking for a frame that will work for my patch and, when I find one, I add a FrameHold node and start working.

Since, 99% of the time, my play-head is sitting on the frame I want to use for my FrameHold when I add the node, it would seem smart for the node to have the ability to grab that frame number, rather than requiring me to suffer the indignity of typing it into a parameter box.

On top, the old, dumb FrameHold. Below, my smart, handsome, new FrameHold.

I've created a gizmo called FrameHold_DS that adds exactly one feature to the standard FrameHold node; a "Use Current Frame" button. I submitted this as as feature request to The Foundry a few months ago, but why wait for a software update for such a simple feature.

As ugly as it is to use the "_DS" suffix for the node name, I wanted to make sure my version of the node would always show up in the Tab+Search tool when I started typing "FrameHold".

To Gizmo, Or Not To Gizmo

I've mentioned, on numerous occasions, that I prefer to create ToolSets over Gizmos because of their ease of installation, modification, and general use. Well, one thing Gizmos can do that ToolSets cannot is automatically open their properties pane as soon as the node is added to the node graph. And since the entire point of creating a custom FrameHold node is to make mine more efficient than the built in node, it would seem that use of a Gizmo is required to give this single-node-tool feature parity with the original.

To that end, here is the code required to add the Gizmo to the interface. Drop it into your menu.py file in your .nuke directory.

toolbar = nuke.menu("Nodes")
gzmos = toolbar.addMenu("Gizmos")
gzmos.addCommand("FrameHold_DS", "nuke.createNode('FrameHold_DS')")

And here is the link to download the Gizmo. Save it in the same .nuke folder, with your menu.py file.

Download: FrameHold_DS Gizmo

Node Sets in Nuke

UPDATE: A newer version of this plugin exists here.

The story goes like this. It may sound familiar.

You're working on an animation in your favorite node-based compositing application, and you want to make a timing change. The first half of the animation is perfect, but it should hold a little longer before it finishes, to better match the background plate.

Problem is, you've got animated nodes all over your script, and all of their keyframes need to move in sync. Transform nodes, Grade nodes, GridWarp nodes.

You zoom in and move around your script, looking for nodes with the little red "A" in the upper right corner.

No, not that node. That one's for that other asset and it doesn't need to move.

Okay, got 'em all open? Now switch the the Dope Sheet, grab everything after frame 75 and slide it to the right a few frames. Done?

Let's watch the new timing.

Shit. Forgot one.

Which one?

Oh, here it is. Wait. How many frames did the other 6 nodes move?

Sigh.

CMD+Z. CMD+Z. CMD+Z. CMD+Z. CMD+Z. CMD+Z.

Okay, are they all open this time? Good. Now slide them all together.

Done? Let's watch it.

Better.

10 Minutes And 20 Additional Nodes Later.

Well...now I need a little less time between frames 30 and 42.

Dammit.

Feature Request

This is the annoying scenario I found myself repeating about a dozen times on a recent project, so I sent an email to The Foundry's support team, requesting the addition of a feature I described as "Node Sets".

A Node Set is an arbitrary collection of nodes that can be opened all at once with a single command. New nodes can be added as the script grows, or removed if they're no longer needed.

Along with my feature request, I provided these two screenshots to help explain:

What I received back from Jake, my new best friend at The Foundry Support, was the following script:

# This function opens the control panels of
# all the nodes with "inNodeSet" on their label

def showOnlyChosenNodes():
  for node in nuke.allNodes():
    if "inNodeSet" in node['label'].value():
      print node.name()
      node.showControlPanel()
    else:
      node.hideControlPanel()

# This function adds "inNodeSet" to a
# new line on the label of all the selected nodes

def labelNodes():
  for node in nuke.selectedNodes():
    label = node['label'].value()
    if 'inNodeSet' not in label:
      node['label'].setValue( label +  '\ninNodeSet')

# This function clears the label of
# all the selected nodes

def unLabelNodes():
  for node in nuke.selectedNodes():
    label = node['label'].value()
    if 'inNodeSet' in label:
      node['label'].setValue( label.replace('\ninNodeSet','') )

# These commands create a new menu item with
# entries for the functions above

nuke.menu('Nuke').addCommand('Node Sets/Show Nodes in Set', "showOnlyChosenNodes()")
nuke.menu('Nuke').addCommand('Node Sets/Add Selected Nodes to Set', "labelNodes()")
nuke.menu('Nuke').addCommand('Node Sets/Remove Selected Nodes from Set', "unLabelNodes()")

For those of you who don't speak Python, allow me explain what's happening here. Once added to your Menu.py file, the script creates 3 tools in a new menu within Nuke.

Just as I requested, I have the ability to add or remove selected nodes from the group, then, when I need to make a change, open all of those nodes with a single command.

Magic.

Not Magic

What the script is actually doing is tagging the nodes. No, Nuke did not suddenly or secretly gain the ability to add tags to things, it's cleverly using the label section in the Node tab to hold the inNodeSet text. The Show Nodes in Set command simply scans all the nodes in your script for nodes with inNodeSet in their labels, and opens them. Simple. Smart.

As a result, yes, you can add the inNodeSet text to the label field manually, rather than using the new menu command, and the Show Nodes in Set command will find it, but who would want to do such a barbarous thing?

Customization

As with all commands in Nuke, a keyboard shortcut can be added to these commands to make the process even quicker. But, since I don't particularly enjoy cluttering up my menu bar with unnecessary menus, nor do I enjoy having more keyboard shortcuts than I can remember (I totally already do), I opted to move the commands into the Nodes menu. This is easily done by swapping the last 3 lines of Jake's script with these lines:

toolbar = nuke.menu("Nodes")
nsets = toolbar.addMenu("Node Sets")
nsets.addCommand('Show Nodes in Set', 'showOnlyChosenNodes()')
nsets.addCommand('Add Selected Nodes to Set', 'labelNodes()')
nsets.addCommand('Remove Selected Nodes from Set', 'unLabelNodes()')

Here's where my tools now live.

I do this for one major reason; having these tools available in the Tab + Search tool. For those unfamiliar, Nuke has a built in tool similar to Spotlight or LaunchBar that allows you to press Tab then type the name of the tool you're looking for, avoiding the need to have keyboard shortcuts for every type of node.

Current Limitations

This being a bit of a hack, there are naturally a few limitations. First and foremost, using this tool will delete anything you already had in the label field of a node. I doesn't support the ability to add a tag to the text in the label field. The tag has to be the only thing in the label field.

Secondly, once you realize how useful this is, you may want to have more than one Node Set at your disposal. The good news about this current limitation is that you can very easily create as many node sets as you want by duplicating the code and changing the inNodeSet tag to something like inNodeSet2.

Of course, with multiple node sets, it'd be ideal if you could include a given node in multiple sets at the same time, but like I mentioned, this is not a real tagging system. If real tagging ever makes its way into the application, I imagine such a thing will then be possible.

Update - 2014-06-25

I emailed my pal Jake again, telling him how much I appreciate his work on this script, and you'll never guess what he did. He sent me an updated version of the script that adds the tag to the node label without overwriting the current text in the field.

Not only is this great for general usability, it means we can add a node to multiple Node Sets at the same time. We now have a real tagging system built into Nuke. How great is Jake? Seriously.

One thing I will note; if you are planning on using multiple Node Sets, you'll want to change the default tag to inNodeSet1. If you leave it as inNodeSet, it will also show up in results for other tags, like inNodeSet2.

Attribution

If it wasn't clear before, all credit for this script goes to The Foundry and their awesome support team. They continue to be one of my favorite companies, specifically because they offer great support in addition to their great products.

I'm incredibly happy to have this annoyance removed from my workflow, and I hope you are too.

Creating Unique Footnotes with MultiMarkdown Metadata

Footnotes. Writers love ’em. But if you’re not paying proper attention when creating them, you can quickly make a mess of your website or blog. In fact, until very recently, this site had broken footnote links all over the place. I’m going to pretend like none of you noticed, and tell you about how I fixed the problem, gently glossing over my past stupidity.

Each post on this site starts as a MultiMarkdown document in Sublime Text 2. When it’s complete, I preview it in Marked, then copy the HTML code and paste it into a new Squarespace post.

The Problem

Thing is, since I’m creating the post locally on my Mac, with no reference to the site as a whole, Marked has no way of knowing which footnote IDs have already been used, and which have not. Therefore each post labels its first footnote fn:1 and subsequent footnotes increase by 1, as you’d expect. The problem occurs when viewing the home page that shows 10 posts on a single page, each with their own fn:1. When you click on the [1] link in the body text, where do you think it’s going to take you? That’s right, to the first footnote it finds with the label fn:1, regardless of which post it was intended to link to [1].

Now, Marked has a setting in its preference pane called Use Random Footnote IDs which is used “to avoid conflicts when multiple documents are displayed on the web.” So this is already a solved problem, right? Probably, but there’s a part of my brain that feels uneasy about using randomly generated IDs. I’m sure using this feature would solve my problem and everything would be fine, but since I’m a nut, I want to control exactly how these unique footnotes are created.

Enter MultiMarkdown. MultiMarkdown includes a number of enhancements to the original Markdown syntax [2], including support for customizable metadata fields [3]. So, I created a custom metadata key called footnote:. Here’s what my boilerplate MultiMarkdown header looks like [4] :

Title:            
Author:         Dan Sturm      
Date:           %snippet:ddate%  
Marked Style:   ds_doc  
footnote:         

Now, whatever keyword I choose to add after the footnote: label will show up in the HTML header as [5].

Make With The Magic

The next thing I needed was a script to scan the HTML for the metadata key, and add it to all the footnote IDs, turning fn:1 into fn:my-footnote-key1.

import sys  
import re  
import subprocess


#   Open the file and convert it to searchable text  

fileText = open (sys.argv[1], "r+")  
searchText = fileText.read()


#   Pull the MultiMarkdown metadata key from the header  

mmdkey = re.search("(?<=\"footnote\" content=\")(.*)(?=\"/>)", searchText, re   .I)  
mmdkey = mmdkey.group()


#   Create the new footnote IDs  

fnnew = ("fn:", mmdkey)  
fnrefnew = ("fnref:", mmdkey)  

fnnew = "".join(fnnew)  
fnrefnew = "".join(fnrefnew)


#   Swap the footnote IDs for the new ones  

fnfix = re.sub("(fn:)", fnnew, searchText)  
fnreffix = re.sub("(fnref:)", fnrefnew, fnfix)


#   Strip HTML Header and Body tags. Copy the result to Clipboard  

def setClipboardData(data):  
  p = subprocess.Popen(['pbcopy'], stdin=subprocess.PIPE)  
  p.stdin.write(data)  
  p.stdin.close()  
  retcode = p.wait()  

fixStripped = re.sub("(?s).*(\n)\n", "", fnreffix)  
fixStripped = re.sub("(?s)\n\n\n().*", "", fixStripped)  
setClipboardData(fixStripped)


#   Write the updated code to the same file  

# fileText.seek(0)  
# fileText.write(fnreffix)  
# fileText.truncate()  
# fileText.close()  

Click here to download the script.

Now that we have that out of the way, let’s talk about how to actually use this code. I’m using a Hazel [6] rule pointed at a folder called Create Unique Footnotes. It looks like this:

The Hazel Rule

Simply put, it watches the folder for a new file and, when it sees one, it runs the script, displays a confirmation message, then trashes the now-unnecessary file, leaving the cleaned up, new code on the clipboard for easy pasting into your CMS of choice. So, when I like what I see in Marked and I’m ready to post, I hit CMD+S and save the HTML file to my Create Unique Footnotes folder, head over to my site, and hit CMD+V into a new post.

A Small Rabbit Hole

There are a few specific things I want to point out, just to make sure we’re clear.

The new HTML code is copied to the clipboard by the Python script, not by the Hazel rule. My workflow involves pasting HTML code into Squarespace, not uploading an HTML file and, since my MultiMarkdown file is the master copy of the post, that’s why I’m deleting the HTML file after running the script.

The HTML file being used as input for the script is a complete HTML document with a header, body tags, the whole shebang. I don’t need those extra bits when I’m pasting the code into Squarespace, so the Python script removes them before placing the code on the clipboard. In fact, the code on the clipboard looks exactly like what you see when you toggle the Switch to HTML Source View button in Marked [7] while previewing your MultiMarkdown document.

Another important note; keen observers will notice the last four lines of the Python script are commented out. That code is there for people who actually want a fully processed HTML document with fixed footnote IDs. Un-commenting-out [8] those four lines will write the fixed code over the original HTML document, while maintaining the header, et cetera. If you plan on using this workflow, you’ll want to remove the step in the Hazel rule that throws away the HTML document. I’d suggest you change that part of the rule to move the new HTML file to the Desktop as a sort of visual confirmation that the file has been updated.

I Believe Some Recognition is in Order

When I initially conceived of this idea I hadn’t the slightest idea how to best go about tackling it. I am not a programmer in any sense of the word. A Twitter conversation with my pal Sid O’Neill revealed that REGEX is the method by which I could find and replace items in the code. I don’t know how to do that, so…

Patterns is a Mac app for creating Regular Expressions that I’ve heard a number of people compliment in the past. It lets you see a live preview of the current pattern matches and, when you’ve got the selection you want, will generate the appropriate code for you; Python in my case. Completely indispensable and only $2.99.

Next, of course I have to thank Stack Overflow from whence I acquired some REGEX knowledge and code. Patterns comes with a great Reference Sheet for REGEX commands, but some of the descriptions still left me befuddled. Stack Overflow also linked me to…

This article by Gabe at Macdrifter, where I got the code that places the HTML on the clipboard. It was exactly what I needed, so I took it. And I would have gotten away with it if it wasn’t for you pesky kids and…nevermind.

In any case, high-fives all around. Go team.


  1. Some of what I’m describing is obfuscated by the use of Bigfoot for my footnotes, specifically the numeral for each footnote, but the problem remains. Let’s move on.  ↩

  2. Like footnotes, for one.  ↩

  3. You can learn all about MultiMarkdown Metadata here.  ↩

  4. Always invoked via TextExpander.  ↩

  5. Obviously, I need to choose a unique key for each post or this whole exercise is pointless.  ↩

  6. You do use Hazel, don’t you? Good.  ↩

  7. It’s in the upper right corner of your document, next to the fullscreen button.  ↩

  8. That’s so not a word, is it?  ↩

Open Last QuickTime File Macro

Yesterday, Dr. Drang had a nice post about creating a keyboard shortcut for the Open Recent menu item in BBEdit using Keyboard Maestro. I purchased Keyboard Maestro a few months ago and have been meaning to find some time to play with it. I’ve also been meaning to find a way to open the most recently viewed video in QuickTime with a global keyboard shortcut. Let’s skip right to the punchline.

KM_Macro_Cropped.png

Throughout the course of a project, I spend a lot of time referring to the most recent cut of a video alongside notes from the client. Once I know the next shot or note I’m going to address, I close the cut, my notes, and get to it. Since my notes live in nvALT, they disappear and reappear with a quick ⌃Z. Now, no matter what I’m doing, I can quickly summon the video file with a keyboard shortcut as well.

A simple tool that removes way more friction that you’d probably guess. It’s a good thing.

Managing Disk Cache (with a Hammer)

Throughout the course of a given project, I use a handful of applications to complete my work. At the moment, I edit in Avid MediaComposer and Final Cut Pro 7. I do my VFX work in NukeX. I review shots and conform sequences in Hiero. And I do final color correction in AfterEffects with Red Giant Colorista II. There’s an obvious advantage to using the right tool for the task at hand, but there’s a caveat that I almost never remember until it smacks me right in the face: disk space.

I’m not talking about the space required for digital negatives, plates, renders, or project files. No, the piece I always manage to forget is the massive disk cache each application in my workflow creates on my startup disk [1]. With single frames of a sequence ranging between 5 and 30Mb, and individual shot versions reaching well into double digits, disk cache can take up a ton of space. And since cache files are created whenever an element is changed and viewed, it’s not an easy task to estimate how much space will be used by a project ahead of time.

Most applications, including every application I use, have built in preferences designed to limit the size of the disk cache. Most also feature a big button labeled “Clear Disk Cache”. These preferences are great if you spend all your time in a single application, but are of little consolation when you’re halfway through previewing a shot in Nuke and OS X pops up telling you your startup disk is full. Once you’re in that sad, embarrassing moment, good luck getting AfterEffects to open so you can hit that “Clear Cache” button.

“To the Finder,” you say? Even if the Finder were responsive when your startup disk had less than 50Mb of free space, are you the kind of person that keeps a sticky note on your monitor listing the paths to all the buried, hidden cache folders for each application? Neither am I.

Historically, I’ve gone straight to my project’s Renders folder and deleted my 2 oldest exports, giving me about 6Gb of breathing room to go hunt down the various disk hogs. Not a great solution. What would be ideal is the ability to hit one keyboard shortcut, see a list of which applications are taking up space and, more importantly, how much space, then quickly purging the unnecessary files.

Normally, the sizes for AfterEffects, Nuke, and Hiero are in the double digits of Gigabytes. This screenshot was taken after using the script as intended.

The Script

cache.command:

#!/bin/sh  

clear  
echo Current Cache Size:  
echo      
du -c -h -s "/Users/dansturm/Library/Preferences/Adobe/After Effects/11.0/Adobe After Effects Disk Cache - Dan’s MacBook Pro.noindex/" "/var/tmp/nuke-u501/" "/var/tmp/hiero/" "/Avid MediaFiles/MXF/" "/Users/dansturm/Documents/Final Cut Pro Documents"  

echo      
read -p "Purge Cache files?(y/n) " -n 1 -r  
echo      
if [[ $REPLY =~ ^[Yy]$ ]]  
then
    rm -r "/Users/dansturm/Library/Preferences/Adobe/After Effects/11.0/Adobe After Effects Disk Cache - Dan’s MacBook Pro.noindex/"*
    rm -r "/var/tmp/nuke-u501/"*
    rm -r "/var/tmp/hiero/"*
    echo    
    echo Done!
    echo      
fi  

The script displays the space taken up by each application, the path to that cache folder, and a total of space used. It then prompts for a y/n input to delete the cache files.

Since managing Avid and Final Cut Pro media requires a bit more attention and nuance than a dumb hammer like this can provide, their disk usage is listed, but their files are not removed. If you modify the script to delete Avid of FCP media, allow me to preemptively say “I told you so” when your project becomes corrupted.

Details

I run the script with a FastScripts keyboard shortcut. I wanted to shortcut to open a new Terminal window to display the information, so the keybaord shortcut actually calls a second short script called cache.sh which takes care of that part:

#!/bin/sh  

chmod +x /Path/To/cache.command; open /Path/To/cache.command  

The paths for the cache folders are hard coded into the main script and, as I mentioned, not all items listed are deleted. I like to see as much information as possible, but manage the deletion list more carefully.

For me, the main offenders of disk cache consumption are AfterEffects and Nuke which, together, average nearly 200Gb of disk usage. Once I’ve dealt with those 2 applications, I don’t usually need to go hunting for more free space.

Next time I accidentally inevitably fill up my startup disk with cache files, it’ll take seconds to rectify, rather than a half hour of excruciatingly slow, manual effort.

Hooray for automation!


  1. While it’s true that, in almost every application, you can re-map the disk cache folder to any disk of your choice, the entire point of a disk cache is to have the fastest read/write speeds possible, and no disk I own is faster than my rMBP’s internal SSD.  ↩

r_ScreenComp ToolSet for Nuke

In my previous post, I said I created QuickGrade so I could quickly balance my Log footage and start compositing more quickly. Based on the footage in the accompanying screenshot, you could probably guess what came next; replacing the screen on the device.

Creating a successful screen comp isn’t rocket science, but since it’s a very (very) common compositing task and, in many cases, the entire focus of a commercial, any tool that helps you work more quickly, while maintaining quality, is worth it’s weight in met-deadlines.

In uncharacteristic fashion, I’ll turn this post over to myself in video form to explain further.

There’s no chance I could have finished the number of shots I was assigned, in the time I had allotted, if it weren’t for this ToolSet. If you do a lot of screen comps in your day-to-day, even if you don’t use my ToolSet [1], I cannot recommend highly enough that you automate as much of the process as possible.

Download


  1. Installing a Nuke ToolSet is as easy as dropping the R_ScreenComp.nk file into \.nuke\ToolSets\  ↩

QuickGrade Tool For Nuke

Lately, I’ve been doing a lot of VFX work with Alexa Log-C footage. Compositing with Log footage generally requires a Viewer LUT so you can actually see what you’re doing. I don’t like using LUT files because they’re fixed color transformations and usually need to be supplemented with additional color tools on a per-shot basis. While I was working, I found myself repeatedly creating the same “custom viewer LUT” setup, so I decided to make it a dedicated tool called QuickGrade.

QuickGrade default parameters.

QuickGrade isn’t really intended to be a creative color tool, it’s built to quickly balance your footage and make it look “correct”. I decided which controls were relevant by noticing that nearly all Alexa Log-C footage I encountered required the same adjustments:

  • Contrast: Obviously. It’s built to be flat.
  • Exposure: After yanking on the contrast, it usually needs an exposure adjustment.
  • Saturation: It’s not inherently overly desaturated, but it benefits from a boost.
  • Green-cast: Alexa Log-C footage typically needs a healthy amount of “de-greening”.

For added flexibility, I also included controls for White Balance, Black Point, and White Point. The controls in the top half of the node are for luminance, and the bottom half for color. Quick and simple.

Workflow

Typically, I drop this node into the Node Graph above the Read node, unconnected, and set it as the Viewer Input Process [1], but it works just as well when used like any other color correction tool.

QuickGrade used as an Input Process.

Not A Gizmo

QuickGrade is a ToolSet for Nuke, not a Gizmo. ToolSets are easier to install than Gizmos, they show up in your toolbar without needing to write any Python code, and they’re easier to modify later if you feel the need. Since the whole idea behind creating this tool was ease of use and speed, the easy, lazy, ToolSet won out over the less easy Gizmo.

To install a Toolset in Nuke, just navigate to your .nuke directory. In there will be a folder called ToolSets. Unzip the QuickGrade.nk file, drop it inside, and you’re done.

Update: 2015-08-21

Okay, so I changed my mind about the whole Gizmo thing. Gizmos, unlike ToolSets, automatically open their properties panes when added to the node graph, which is great. So, now you can choose from either option below.


Download: Nuke Gizmo


  1. Using a node (or group of nodes) as a Viewer Input Process is as easy as right-clicking on the node, selecting Edit\Node\Use as Input Process. Bam.

My Custom Nuke Defaults

After a few busy months of post work, I finally found a few days to reevaluate and improve my workflows and system preferences. Since I spend a majority of my time in NukeX, that’s where I decided to start.

I’ve got some new custom tools I built recently that I’ll share with you soon enough, but first things first, Nuke’s default state needed a little adjusting. Here are the items I added to my init.py [1] file that save me tons of time and headache.

init.py:

# Project Settings > Default format: HD 1920x1080  
nuke.knobDefault("Root.format", "HD")  

# Viewer Settings > Optimize viewer during playback: on  
nuke.knobDefault("Viewer.freezeGuiWhenPlayBack", "1")  

# Write > Default for EXR files: 16bit Half, No Compression  
nuke.knobDefault("Write.exr.compression","0")  

# Exposure Tool > Use stops instead of densities  
nuke.knobDefault("EXPTool.mode", "0")  

# Text > Default font: Helvetica Regular (in Dropbox folder)  
nuke.knobDefault("Text.font",   "/Path/to/Dropbox/fonts/HelveticaRegular.   ttf")  

# StickyNote > default text size: 40pt  
nuke.knobDefault("StickyNote.note_font_size", "40")  

# RotoPaint > Set default tool to brush, set default lifetime for brush and clone to "all frames"  
nuke.knobDefault("RotoPaint.toolbox", "brush {{brush ltt 0} {clone ltt 0}}")  

Explain Yourself

Since I don’t work in feature film VFX, the HD frame size is a no-brainer.

I do a fair amount of motion graphics animation in Nuke, so I often have the Curve Editor open. I’ve always been frustrated that Nuke never seems to be able to achieve realtime playback when looking at curves, so I ended up making adjustments, then switching back to the Node Graph to view my changes. Very annoying. The recently added “Optimize viewer during playback” button was the answer to my realtime problems [2]. Like all of these custom preferences, I use it so often, I want it to be on by default.

I comp almost exclusively in Open EXR image sequences. For me, 16bit Half Float with No Compression is the appropriate balance of file size and quality. By default, the Write node sets compression to Zip (1 scaneline) and it annoys the crap out of me to change it every time.

I love to use the Exposure tool, especially when color-correcting Log footage by hand [3]. But since I’m a filmmaker and a human being, I prefer to adjust exposure in Stops rather than Densities.

I set the Text node to use Helvetica by default and I keep the font in my Dropbox folder to make sure it’s always with me. Why? Because the default is normally Arial and seriously, are you kidding me?

I love using StickyNote nodes to write myself notes as I’m working. But because either my screen resolution is too high or I’m getting old and going blind [4], I always have to crank up the font size to read the damn things.

When I decide to use a RotoPaint node instead of a simple Roto node, it’s because I want to paint something. And more often than not, I want to paint or clone something for the entire duration of the shot, rather than just a single frame. Boom. Default.

What Else?

I would love to set the default feathering falloff in the Roto and RotoPaint nodes to smooth rather than linear, but I haven’t been able to figure out how to make that happen as of yet.

If you’d like to use these preferences in your Nuke setup, simply copy and paste the code into your init.py file in your .nuke directory. If you don’t have an init.py file in there, just open a text editor and make one.

Happy comping.

UPDATE – September 09, 2013, 04:55:04PM

As Joe Rosensteel pointed out on Twitter, another great tip is changing your 3D control type to Maya controls. I’m not a Maya user myself, but nearly all the 3D artists I work with are, and nothing makes them happier to help you out than saying, “Would you like to take stab at it? You know the 3D controls are the same as Maya’s”. And the 3D control type preference is super easy to adjust. It’s part of the GUI in the application preferences pane, under the Viewers tab.


  1. If you were unaware, you can modify Nuke’s default state by creating a file called init.py in your .nuke directory. The application loads your preferences on launch and it’s easy enough to add/remove settings without screwing up your install. More info on page 18 of the Nuke User Guide  ↩

  2. I don’t remember exactly which version introduced it, but it’s the button that looks like a snowflake to the left of the playback controls.  ↩

  3. Yes, I’m familiar with the concept of LUTs.  ↩

  4. Rhetroical.  ↩