Home

You’re Doing That Wrong is a journal of various successes and failures by Dan Sturm.

Creating Unique Footnotes with MultiMarkdown Metadata

Footnotes. Writers love ’em. But if you’re not paying proper attention when creating them, you can quickly make a mess of your website or blog. In fact, until very recently, this site had broken footnote links all over the place. I’m going to pretend like none of you noticed, and tell you about how I fixed the problem, gently glossing over my past stupidity.

Each post on this site starts as a MultiMarkdown document in Sublime Text 2. When it’s complete, I preview it in Marked, then copy the HTML code and paste it into a new Squarespace post.

The Problem

Thing is, since I’m creating the post locally on my Mac, with no reference to the site as a whole, Marked has no way of knowing which footnote IDs have already been used, and which have not. Therefore each post labels its first footnote fn:1 and subsequent footnotes increase by 1, as you’d expect. The problem occurs when viewing the home page that shows 10 posts on a single page, each with their own fn:1. When you click on the [1] link in the body text, where do you think it’s going to take you? That’s right, to the first footnote it finds with the label fn:1, regardless of which post it was intended to link to [1].

Now, Marked has a setting in its preference pane called Use Random Footnote IDs which is used “to avoid conflicts when multiple documents are displayed on the web.” So this is already a solved problem, right? Probably, but there’s a part of my brain that feels uneasy about using randomly generated IDs. I’m sure using this feature would solve my problem and everything would be fine, but since I’m a nut, I want to control exactly how these unique footnotes are created.

Enter MultiMarkdown. MultiMarkdown includes a number of enhancements to the original Markdown syntax [2], including support for customizable metadata fields [3]. So, I created a custom metadata key called footnote:. Here’s what my boilerplate MultiMarkdown header looks like [4] :

Title:            
Author:         Dan Sturm      
Date:           %snippet:ddate%  
Marked Style:   ds_doc  
footnote:         

Now, whatever keyword I choose to add after the footnote: label will show up in the HTML header as [5].

Make With The Magic

The next thing I needed was a script to scan the HTML for the metadata key, and add it to all the footnote IDs, turning fn:1 into fn:my-footnote-key1.

import sys  
import re  
import subprocess


#   Open the file and convert it to searchable text  

fileText = open (sys.argv[1], "r+")  
searchText = fileText.read()


#   Pull the MultiMarkdown metadata key from the header  

mmdkey = re.search("(?<=\"footnote\" content=\")(.*)(?=\"/>)", searchText, re   .I)  
mmdkey = mmdkey.group()


#   Create the new footnote IDs  

fnnew = ("fn:", mmdkey)  
fnrefnew = ("fnref:", mmdkey)  

fnnew = "".join(fnnew)  
fnrefnew = "".join(fnrefnew)


#   Swap the footnote IDs for the new ones  

fnfix = re.sub("(fn:)", fnnew, searchText)  
fnreffix = re.sub("(fnref:)", fnrefnew, fnfix)


#   Strip HTML Header and Body tags. Copy the result to Clipboard  

def setClipboardData(data):  
  p = subprocess.Popen(['pbcopy'], stdin=subprocess.PIPE)  
  p.stdin.write(data)  
  p.stdin.close()  
  retcode = p.wait()  

fixStripped = re.sub("(?s).*(\n)\n", "", fnreffix)  
fixStripped = re.sub("(?s)\n\n\n().*", "", fixStripped)  
setClipboardData(fixStripped)


#   Write the updated code to the same file  

# fileText.seek(0)  
# fileText.write(fnreffix)  
# fileText.truncate()  
# fileText.close()  

Click here to download the script.

Now that we have that out of the way, let’s talk about how to actually use this code. I’m using a Hazel [6] rule pointed at a folder called Create Unique Footnotes. It looks like this:

The Hazel Rule

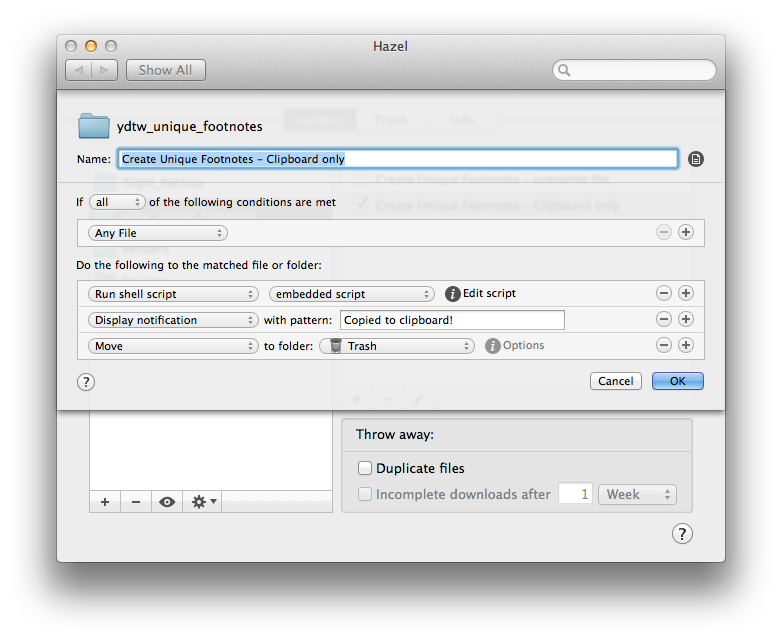
Simply put, it watches the folder for a new file and, when it sees one, it runs the script, displays a confirmation message, then trashes the now-unnecessary file, leaving the cleaned up, new code on the clipboard for easy pasting into your CMS of choice. So, when I like what I see in Marked and I’m ready to post, I hit CMD+S and save the HTML file to my Create Unique Footnotes folder, head over to my site, and hit CMD+V into a new post.

A Small Rabbit Hole

There are a few specific things I want to point out, just to make sure we’re clear.

The new HTML code is copied to the clipboard by the Python script, not by the Hazel rule. My workflow involves pasting HTML code into Squarespace, not uploading an HTML file and, since my MultiMarkdown file is the master copy of the post, that’s why I’m deleting the HTML file after running the script.

The HTML file being used as input for the script is a complete HTML document with a header, body tags, the whole shebang. I don’t need those extra bits when I’m pasting the code into Squarespace, so the Python script removes them before placing the code on the clipboard. In fact, the code on the clipboard looks exactly like what you see when you toggle the Switch to HTML Source View button in Marked [7] while previewing your MultiMarkdown document.

Another important note; keen observers will notice the last four lines of the Python script are commented out. That code is there for people who actually want a fully processed HTML document with fixed footnote IDs. Un-commenting-out [8] those four lines will write the fixed code over the original HTML document, while maintaining the header, et cetera. If you plan on using this workflow, you’ll want to remove the step in the Hazel rule that throws away the HTML document. I’d suggest you change that part of the rule to move the new HTML file to the Desktop as a sort of visual confirmation that the file has been updated.

I Believe Some Recognition is in Order

When I initially conceived of this idea I hadn’t the slightest idea how to best go about tackling it. I am not a programmer in any sense of the word. A Twitter conversation with my pal Sid O’Neill revealed that REGEX is the method by which I could find and replace items in the code. I don’t know how to do that, so…

Patterns is a Mac app for creating Regular Expressions that I’ve heard a number of people compliment in the past. It lets you see a live preview of the current pattern matches and, when you’ve got the selection you want, will generate the appropriate code for you; Python in my case. Completely indispensable and only $2.99.

Next, of course I have to thank Stack Overflow from whence I acquired some REGEX knowledge and code. Patterns comes with a great Reference Sheet for REGEX commands, but some of the descriptions still left me befuddled. Stack Overflow also linked me to…

This article by Gabe at Macdrifter, where I got the code that places the HTML on the clipboard. It was exactly what I needed, so I took it. And I would have gotten away with it if it wasn’t for you pesky kids and…nevermind.

In any case, high-fives all around. Go team.


  1. Some of what I’m describing is obfuscated by the use of Bigfoot for my footnotes, specifically the numeral for each footnote, but the problem remains. Let’s move on.  ↩

  2. Like footnotes, for one.  ↩

  3. You can learn all about MultiMarkdown Metadata here.  ↩

  4. Always invoked via TextExpander.  ↩

  5. Obviously, I need to choose a unique key for each post or this whole exercise is pointless.  ↩

  6. You do use Hazel, don’t you? Good.  ↩

  7. It’s in the upper right corner of your document, next to the fullscreen button.  ↩

  8. That’s so not a word, is it?  ↩

Converting MultiMarkdown to HTML with TextExpander

If you’re here, reading this site, chances are pretty good that you use and love MultiMarkdown as much as I do. That, or you’re at least fairly curious and have a plenty of free time.

With more and more applications supporting Markdown natively, the need to convert the text to HTML is decreasing in frequency. However, the need isn’t completely gone. Sometimes you just need some good old fashioned HTML.

A Hammer For Every Season

(Or Some Other Metaphor That Actually Makes Sense)

There are almost as many ways to get your MultiMarkdown into HTML as there are applications that support Markdown.

I’ve created build systems for Sublime Text to convert MultiMarkdown documents to HTML files. I’ve got a build system that lets Marked do the heavy lifting for me. For the times I don’t need a full MultiMarkdown document, just a small snippet of text, I’ve got Brett Terpstra’s killer MultiMarkdown Service Tools.

It’s probably due to the myriad of tools at my disposal that I only recently discovered I’m unable to use Brett’s OS X Services in Sublime Text 2. I’ll admit, I didn’t try very hard, but after Control + Clicking, trying my keyboard shortcuts, and doing a bit of searching online, I quickly gave up and decided to build a tool I knew would work.

To TextExpander We Go!

When I need a system-wide tool that works in any application, activated by a few quick keys, the answer is almost always TextExpander. With its ability to act as an intermediary between text and scripts, TextExpander is the hammer that always gets the job done [1].

The snippet:

#!/bin/bash
pbpaste | /usr/local/bin/mmd

Just like my other text processing scripts, proper use involves selecting the text to be processed, copying it to the clipboard, and invoking the snippet, which I’ve bound to the command ;mmd. Now, any time I need to convert MultiMarkdown text into HTML, without the hassle of saving files and opening specific applications, I’ve got a quick, universal keyboard command I can use. Bringing me one step closer to an application agnostic workflow.

Hooray!


  1. Yes, I’m sticking with the hammer metaphor. I’m in too deep to turn back now.  ↩

Running Scripts with TextExpander

I love that the Internet is full of smart people making and sharing awesome things. Like Dr. Drang and his Tidying Markdown Reference Links script. Seth Brown’s formd is another great tool I don’t know how I ever lived without. But, being the amateur that I am, I always struggle to figure out just how to use the scripts these amazing programmers have been kind enough to provide.

Lucky for me (and you), I’m able to play along with the help of everyone’s favorite writing tool, TextExpander. In the documentation for formd, Seth was gracious enough to spell it out for us laypersons[1].


To run formd with TextExpander, simply place the Markdown text to convert onto the clipboard and issue the appropriate TextExpander shortcut (I use fr or fi for referenced or inline, respectively).

It took longer than I’d like to admit, but eventually I realized this snippet could be tweaked to run any script I happen to download from a coder more skilled than myself. Additionally, since most of the scripts I want to use are built for processing text, the copy/paste activation generally works great.

#!/bin/bash
pbpaste | python /Path/To/Your/Script/script.py

With this short snippet, I can copy my text to be processed, invoke the script snippet of my choosing, and have the results immediately pasted back into my text editor, email, or wherever.

This particular snippet assumes you’re running a python script, but you can just as easily swap python for ruby or perl. Or you can omit the python call if you’re just running a standard Bash command. As long as it’s a valid command that would run in the Terminal[2], you can automate it this way. And, just as with formd, to use the snippet, you simply Copy the text to be processed, and invoke the snippet.

Boom. Done. Life is grand.

While none of this is new or revolutionary, connecting the dots between TextExpander and the Terminal is something I wish I’d have discovered long ago and, therefore, may be of interest to you.

Of course none of this would be possible without the amazing minds that write the scripts in the first place. So, along with this post, I offer a sincere Thank You to Dr. Drang and his site And now it’s all this, as well as Seth Brown and his site Dr. Bunsen.


  1. Layfolk? Laypeople? Missing the point?  ↩

  2. And frankly, I just start trying things in the Terminal until I find the correct command.  ↩

Fountain for Sublime Text

Jonathan Poritsky has created a great Fountain package for Sublime Text. It supports almost everything outlined in the Fountain syntax guide but, most importantly, gives us syntax highlighting.

While not everyone likes the idea of using colors to highlight elements in their screenplay, I most definitely do. For me, syntax highlighting is equivalent to the red squiggly line underneath a misspelled word. At a glance, I can see if I've made any errors and, to a lesser degree, I can recognize patterns of highlighted elements to quickly understand where I am in the overall document.

Another reason I want syntax highlighting is to ease my recent transition to full-time use of Fountain for screenwriting writing projects, replacing my roll-your-own MultiMarkdown screenplay syntax.

The Part Where I Ruin Everything

Hands down, my favorite part of Jonathan's Fountain package is its ability to be customized, like all Sublime Text packages. The default package theme does a good job of emulating the look of a screenplay, using layout settings like 15pt black Courier on a white background and centering the text within the document window, etc.

While I enjoy reading screenplays in their correct format, I really dislike that layout during the writing process. I much prefer to look at white text on a black document. More specifically, I use the Sunburst theme in Sublime Text while writing in MultiMarkdown. Since Fountain is designed specifically to be platform and application agnostic, I'm free to be as picky as I want about my writing environment.

So, I tweaked the theme that came with the Fountain package. The biggest thing I wanted to add was background highlighting for Scene Headings. It helps me quickly scan the document to find the beginning of a given scene.

I made all Scene Headings, Action, Character, and Dialogue elements white(ish), and Parentheticals, Sections, Synopses a dimmer grey color to help them fade into the background a bit. The only elements that use colored text are Transitions, Notes, and the Title Page, which uses the same color scheme as MultiMarkdown metadata in the Sunburst theme.

In Fountain.sublime-settings I removed the additional line padding, changed the font to Monaco 11, turned on line numbering, and turned off "draw_centered". What I'm left with is a document that looks nothing like a screenplay, just the way I like it.

Personally, I don't want to feel like I'm writing a screenplay. Writing a screenplay is hard and stressful. Conversely, writing words into a text editor is something I can do all day long. Maybe some day I won't be so particular or need to psych myself out in order to write, but for now, this feels right to me and I'm sticking with it.

If for some reason you would like to use my theme, download this file and drop it into the Fountain folder in your Sublime Text package directory. Once you've done that, open up Fountain.sublime-settings and make yours match mine:

{  
    "extensions":  
    [  
    "fountain"  
    ],  
    "font_face": "Monaco",  
    // "font_face": "Courier Screenplay",  
    // "font_face": "Courier Final Draft",  
    "font_size": 11,  
    "color_scheme": "Packages/Fountain/Fountain Dan.tmTheme",  
    "word_wrap": true,  
    "wrap_width": 78,  
    // "line_padding_top": 5,  
    "draw_centered": false,  
    "spell_check": true,  
    "indent_subsequent_lines": false,  
    "trim_automatic_white_space": true,  
    "line_numbers": true,  
    "translate_tabs_to_spaces": true,  
    "auto_complete_commit_on_tab": true,  
    "auto_complete_with_fields": true  
}

Launching Marked from Sublime Text 2

I do pretty much all my MultiMarkdown writing anymore in Sublime Text 2. I’ve come to rely on Marked for previewing my files with a variety of custom CSS files, depending on the type of project I’m writing.

At the moment, the most annoying part of this workflow is the time it takes to open Marked and locate the MultiMarkdown file I’m currently working on in Sublime Text. I think I’ve been spoiled by the speed of using Sublime Text’s Goto Anything feature (Command + P) for opening files.

To speed things along, I wrote a new build system for Sublime Text that launches the active document in Marked. Now previewing my active file is as easy as invoking the build command which, for me, is still Command + B.

The (insanely simple) code [1]:

{  
"shell": "true",  
"cmd": ["open -a marked \"$file\""]  
}  

More non-rocket-science, but a big time saver in my world.


  1. This build system is only for OS X.  ↩

Creating Linked Images with TextExpander

I have a TextExpander snippet for creating Markdown links. I have one for creating Markdown images. Both pull a URL from the clipboard.

On occasion I’ve used them in combination to create images that are linked to the, usually larger, original images. I don’t know why it’s taken me this long to create a single snippet to do this one task, but a recent project filled with high-rez images necessitated such a tool.

For this particular project, I’ve also used a fill variable to add a description to the image. Not rocket science, but just another tool to save myself a lot of time and frustration.

The Snippet:

[![%fill:description%](%clipboard) %fill:description%](%clipboard)

MultiMarkdown Build Systems for Sublime Text 2

When I started using Sublime Text 2 as my primary text editor, last year sometime, I created a build system to more quickly process my MultiMarkdown files. Since I couldn’t find a preexisting MultiMarkdown build system in the Sublime Text forum, it’s probably a safe bet that others might find it useful for me to post mine.

Since all of my writing is based on MultiMarkdown and varying CSS files, I use the same build system for screenplays, blog posts, presentations, etc. When I created the initial build system I was doing the majority of my writing on a Windows 7 machine. Since that time, I have retired all of my Windows computers [1] and created a new build system for OS X (10.7.3).

Here are both build systems:

OS X

{
"shell": "true",
"path": "/usr/local/bin",
"cmd": ["mmd \"$file\""]
}

Windows

{
"shell": "true",
"cmd": "multimarkdown -b \"$file\"",
"cmd": "\"\"${file/\\.txt/\\.html/}\"\""
}

The last line in the Windows build system is a launch command that will open the processed document in your default HTML application. Since I have Marked on my Mac, I decided to omit the launch command from the OS X version and pick my viewer on a per-file basis.


  1. For a number of reasons, I’m still required to use a VM of Win 7 on my Mac via Parallels.  ↩

Fountain for Cheaters

Fountain for Cheaters

Earlier today Brett Terpstra posted Cheaters, a “customizable cheat sheet system”. It’s easy to use, super helpful, and just all around awesome.

I had a little time this afternoon so I whipped up a Fountain syntax guide, pulled from the fountain.io syntax page. Here are links to the Fountain sheet and the modified CSS file. Follow Brett’s instructions to customize your own cheatsheet.

I plan on adding my SP-MMD syntax to my cheatsheet, as well as my still-in-development MultiMarkdown sildeshow presentation tool.

FYI, since I’m strictly an amateur, I make no guarantees that this will work as well for you as it does for me.

A huge thanks to Brett for this insanely useful tool.