Home

You’re Doing That Wrong is a journal of various successes and failures by Dan Sturm.

Node Sets for Nuke v1.2

The Selectable Edition

Yesterday, while trying to address a note on a near-finished animation, I discovered the need for a new tool in my Node Sets toolbox that was both useful and trivially simple to create. A rare combination when it comes to my code.

The original intended use for the Node Sets tagging tools was that animated nodes would be tagged as you work and, when you need to adjust an animation's timing, you would run the "Show Nodes" command to open all of the tagged nodes. The idea being, you'll need to open not only the nodes that need to be adjusted, but also all of the other relevant animated nodes for timing and context.

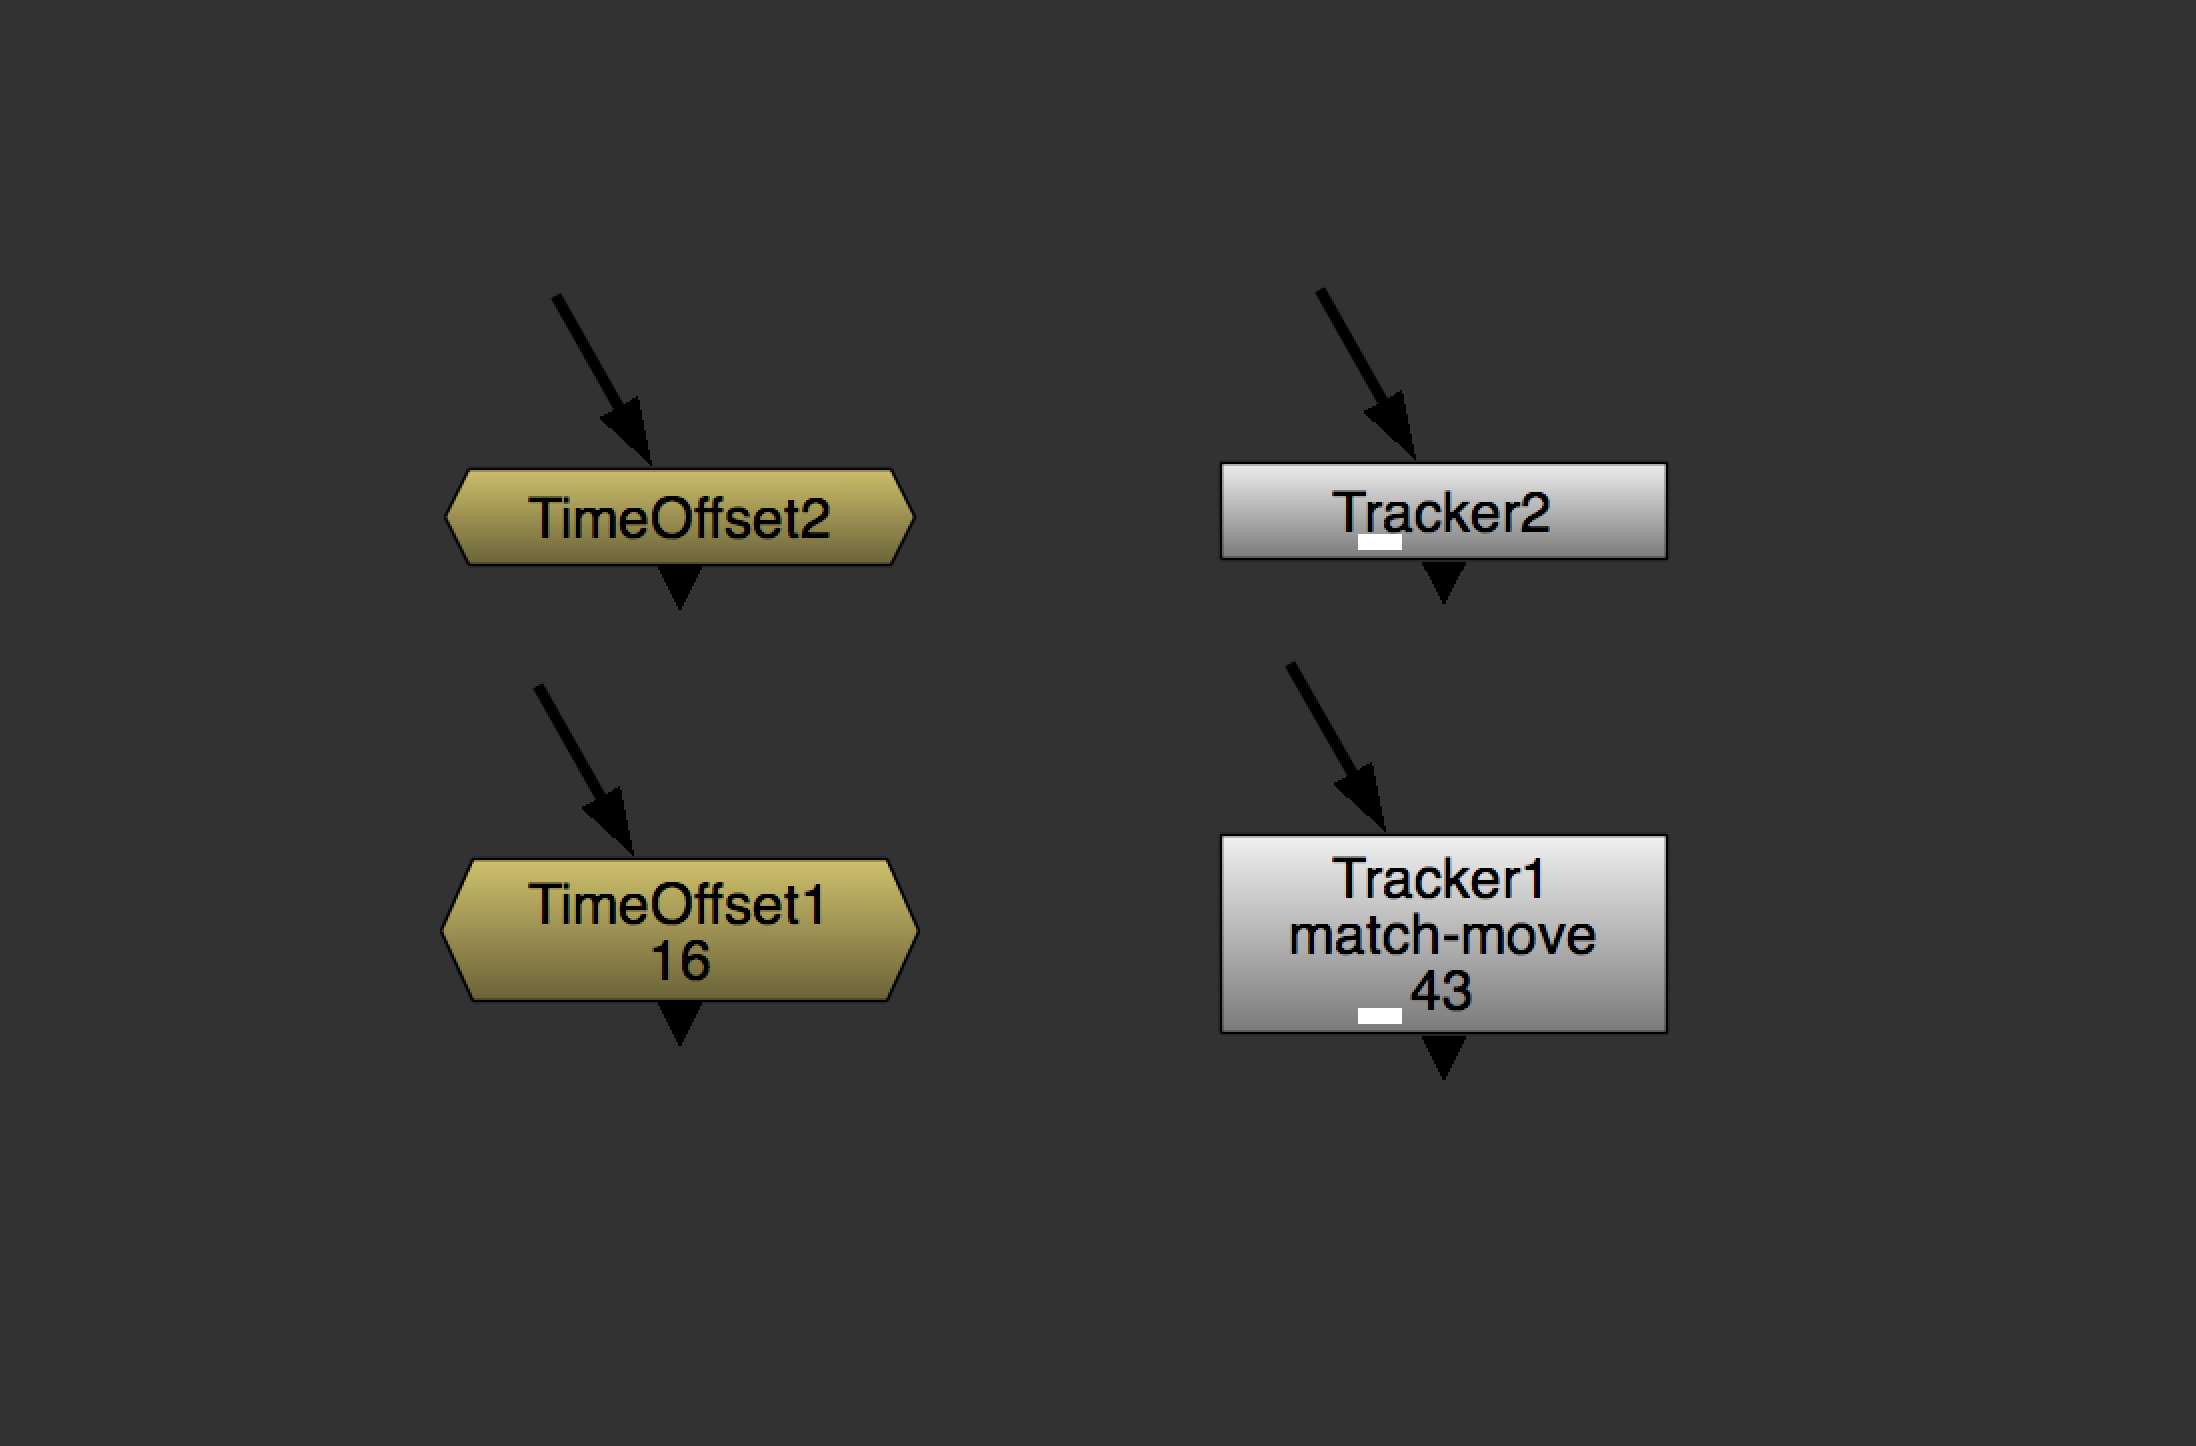
The problem I encountered involves this methodology's inability to scale with the modularity of larger projects. One of the main benefits of a node-based workflow is the ability to create any number of blocks of operations, separate from the main process tree, then connect and combine them as necessary. Each of these blocks would have its own set of animated nodes, building a piece of the overall animation.

But the comp I was working on yesterday had 140 tagged animated nodes and, while it would technically still work to open all of them every time I need to make a timing change, it's slow and unwieldy to have 140 node property panes open at the same time.

A solution I proposed to this issue in the v1.0 blog post was the ability to use a different tag for different types or groups of nodes and open them each independently. A fine idea that I never personally implemented because the tags are hard coded into the tool and there's no way to add more tags without closing the app, modifying the menu.py file, and cluttering up the toolset with a lot of similarly named tools. A terrible workflow.

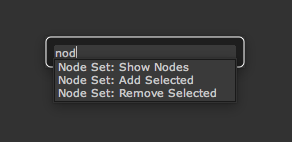
A solution that solves this problem in a much simpler, smarter way is to use a selection of nodes to narrow the search for tags. So, when working on a smaller section of the animation, I can select a block of nodes and run the new command "Node Set: Show Selection" to open the tagged nodes contained within.


The selected block of nodes used to search for tagged nodes.


The Code

Like I mentioned at the top of this post, the code for this new addition was exceptionally simple. Specifically, I duplicated and renamed the "Node Set: Show Nodes" code, and changed one word. In the function's for loop, I changed nuke.allNodes() to nuke.selectedNodes(). And that was it. Writing this blog post has already taken several orders of magnitude longer than writing the code.

The full function, called showOnlySelectedNodes(), looks like this:

def showOnlySelectedNodes():
  names = []
  li = []
  for node in nuke.selectedNodes():
    if "inNodeSet" in node['label'].value():
      names.extend([node.name()])
      li.extend([node])
  numPan = nuke.toNode('preferences')['maxPanels']
  numPan.setValue(len(names))
  for i in range(len(li)):
    node = li[i]
    node.showControlPanel()

And the additional line to add the tool to the menu is:

nsets.addCommand('Node Set: Show Selection', 'showOnlySelectedNodes()', icon='NodeSetsMenu-show.png')

It's rare that the solution to an issue I encounter while working is so simple to create that it's quicker to just make the tool than capture a note to create it later, but that was the case with this one and I'm very happy to have this new option.

Head over to the Downloads page to get the full updated Node Sets v1.2 code.

Global Motion Blur Controls in Nuke

I’m back again with another custom tool for my Nuke setup. That can mean only one thing: I’m doing dumb stuff again.

I recently embarked on another large motion graphics project, animated entirely in Nuke. Just as with the creation of my Center Transform tool, using Nuke for such a project quickly reveals a glaring omission in the native Nuke toolset which, on this project, I just couldn't continue working without. I speak, of course, of Global Motion Blur Controls.

The Use Case

Most assets that move, especially motion graphics, need to have motion blur on them. But motion blur is incredibly processor-intensive, so, while you're working, it's almost always necessary to turn off motion blur while you animate, turning it back on to preview and render.

In Nuke, that means setting the motionblur parameter on a Transform node to 0 while you work, then setting it to 1 (or higher) to preview and render. Simple enough when you only have a handful of Transform nodes in your script. Nigh impossible to manage when you have almost 200.

The Problem

Currently, each Transform node has its own set of motion blur controls: Samples, Shutter, and Shutter Offset. There is no mechanism for modifying or enabling / disabling all motion blur parameters at the same time like there is in, say, After Effects.

Smart Nuke artists will use Cloned Transform nodes or expression link the motion blur parameters to each other. Or, take it one step further and create a custom motion blur controller with a NoOp node and expression link all Transforms to that.

While that saves some effort, you've got to add the NoOp expression to every Transform node (twice), including each new Transform you create. And, of course, there's the very likely possibility that you'll forget or miss one along the way and have to track it down once you notice your render looks wrong.

This is how I have previously dealt with this problem.

A Half-Step Forward

To make this process faster, I wrote a script to quickly expression link the motionblur and shutter parameters of selected nodes to my custom NoOp, which I have saved as a Toolset for easy access in each new Nuke script.

That script looks like this:

def SetNoOpBlur():
  for xNode in nuke.selectedNodes():
    xNode['motionblur'].setExpression( 'NoOp1.mBlur' )
    xNode['shutter'].setExpression( 'NoOp1.mShutter' )

toolbar = nuke.menu("Nodes")
gzmos = toolbar.addMenu("Gizmos", icon='Gizmos4.png')
gzmos.addCommand("Link NoOp Blur Control", 'SetNoOpBlur()')

The Link to NoOp tool in Nuke

This makes the expression linking faster and easier, but I still have to select all the Transform nodes by hand before running the script. It's also incredibly fragile since I hard-coded the name of the controller node (NoOp1) into the function.

This level of half-assed automation simply won't do. We need to whole-ass a better solution.

The Solution

The goal would be to have motion blur settings in the Nuke script's Project Settings that control all Transform nodes by default, with the ability to override each node's individual settings, as needed.

Here’s what I came up with [1]:

# Customize Transform Controls - No Center Transform Button

def OnTransformCreate():
  nTR = nuke.thisNode()
  if nTR != None:
    # Create "Use Local Motion Blur" button
    lbscript="mbT = nuke.thisNode()['motionblur']; mbT.clearAnimated(); stT = nuke.thisNode()['shutter']; stT.clearAnimated(); soT = nuke.thisNode()['shutteroffset']; stT.clearAnimated();"
    lb = nuke.PyScript_Knob('clear-global-mblur', 'Use Local Motion Blur')
    lb.setCommand(lbscript)
    nTR.addKnob(lb)
    # Create "Use Global Motion Blur" button
    gbscript="nBB = nuke.thisNode(); nBB['motionblur'].setExpression('root.motionblur'); nBB['shutter'].setExpression('root.shutter'); nBB['shutteroffset'].setExpression('root.shutteroffset');"
    gb = nuke.PyScript_Knob('use-global-mblur', 'Use Global Motion Blur')
    gb.setCommand(gbscript)
    nTR.addKnob(gb)
    # Set Transform Node to use Global Motion Blur by Default
    nTR['motionblur'].setExpression('root.motionblur')
    nTR['shutter'].setExpression('root.shutter')
    nTR['shutteroffset'].setExpression('root.shutteroffset')

nuke.addOnUserCreate(OnTransformCreate, nodeClass="Transform")

# Root Modifications for Global Motion Blur

def GlobalMotionBlur():
  ## Create Motion Blur tab in Project Settings
  nRT = nuke.root()
  tBE = nuke.Tab_Knob("Motion Blur")
  nuke.Root().addKnob(tBE)
  
  ## Create motionblur, shutter, and shutter offset controls, ranges, and defaults
  mBL = nuke.Double_Knob('motionblur', 'motionblur')
  mBL.setRange(0,4)
  sTR = nuke.Double_Knob('shutter', 'shutter')
  sTR.setRange(0,2)
  oFS = nuke.Enumeration_Knob('shutteroffset', 'shutter offset', ['centered', 'start', 'end'])
  oFS.setValue('start')
  
  ## Add new knobs to the Motion Blur tab
  mblb = nuke.Text_Knob("gmbcl","Global Motion Blur Controls")
  nRT.addKnob(mblb)
  nRT.addKnob(mBL)
  nRT.addKnob(sTR)
  nRT.addKnob(oFS)

GlobalMotionBlur()

Init.py Script

# Global Motion Blur Defaults
nuke.knobDefault("Root.motionblur", "1")
nuke.knobDefault("Root.shutter", ".5")
nuke.knobDefault("Root.shutteroffset", "start")

The Motion Blur tab in Project Settings

The expression linked motion blur controls

The unlink / re-link buttons

I’ve created global parameters for Motion Blur, Shutter, and Shutter Offset [2]. When you create a Transform node, it automatically adds 2 buttons to the User tab to make it easy to unlink / re-link to the global controller.

In my version, all Transform nodes created are linked to the global setting by default. If you'd prefer each node be un-linked by default, you can just remove the last 3 lines of the OnTransformCreate() function. Then, you can click the "Use Global Motion Blur" button on each node that you want to link.

While I haven't spent a ton of time with this new setup, I'm really happy with how it's come out. Though, as with most of my weird customizations, I look forward to the day that The Foundry adds this functionality to the app, making my code obsolete.


  1. This is just the new code without the Center Transform button that I normally have in my OnTransformCreate() function. The function in my Menu.py file actually looks like this.  ↩

  2. I did not add the Custom Shutter Offset control to the global controller because, for one, I really don’t use that option much (or ever), and two, it turned out to be much harder to script than the rest of the options. It simply wasn’t worth the effort to figure out how to create a global controller for something I never use, and the command is still accessible by using per-node motion blur settings.  ↩

Replacing Native Nuke Nodes with Custom Gizmos

Friends, I feel like an idiot.

So many of the posts on this site are about creating custom gizmos to replace the native nodes inside of Nuke. But they've never completely satisfied their mission because, until now, I didn't know how to tell Nuke, "Hey, when I call a FrameHold give me my FrameHold_DS gizmo instead". So my FrameHold_DS gimzo has lived alongside the native FrameHold node since its creation. Which, by the way, is super annoying because it shows up lower in the tab-search results than the native node.

The alternative I've used — to a lesser degree of success — is to customize native nodes with the addOnUserCreate python function. While that has been effective at adding features to the native nodes, it's entirely python based and results in all my customizations being banished to a properties tab named "User". Just the sight of which makes me sad.

The good news is, I have finally figured out how to actually tell Nuke "Hey, when I call a FrameHold give me my FrameHold_DS gizmo instead". The bad news is, it's so incredibly, stupidly easy, I can't believe it took me this long to figure it out.

I was reading the Assigning a Hotkey section of the "Customizing the UI" python guide and saw this:

To assign a hotkey to an existing menu item, you effectively replace the whole menu item.

Let’s assign a hotkey to the Axis2 node.

nuke.menu( 'Nodes' ).addCommand( '3D/Axis', nuke.createNode( 'Axis2' ), 'a')

Pressing a on the keyboard now creates an Axis node.

I've known for a long time that I could add custom hotkeys to nodes, but the tab-search method was always fast enough for me that I've never wanted to do so.

But what caught my eye was the line of code. Before adding the hotkey, it defines the application's menu path to the node, then the createNode call for the node itself.

I thought to myself, there's no way I could just swap out the node name in the createNode call with the name of one of my gizmos. It couldn't possibly be that easy.

It is.

By adding the single line of code —

nuke.menu( 'Nodes' ).addCommand( 'Time/FrameHold', "nuke.createNode( 'FrameHold_DS' )")

— to my Menu.py file, calling a FrameHold node will now result in my FrameHold_DS gizmo being added instead.

Now, rather than debating which half-assed method for creating custom nodes is more suited to the tool I'm trying to create, I will create custom gizmos and remap their calls using this method.

I've been wanting to do this for so long. It's a very exciting discovery for me, only slightly overshadowed by feeling like a total doofus for not figuring it out sooner.

Postscript

"But what if I want to be able to call the native node at some point, too?"

Well, I have no desire to do that, but if you do, you could always add a second line of code to rename the native node to something else, like:

nuke.menu( 'Nodes' ).addCommand( 'Time/Dumb-Stupid-Native-FrameHold', "nuke.createNode( 'FrameHold' )")

That way it won't show up when you hit tab and start typing "Fra", but you will be able to find it if you need it.

Dumb Hold 2.png

Nuke: Center Transform Button

As I continue to use Nuke in ways in which it was never intended to be used (read: motion graphics), I keep finding small bits of friction that I just can't help but remove with app customizations.

My latest annoyance stems from an animated project that involved more traditional motion-graphics-style animation than the typical interface design and animation I usually create. I built all the graphic assets I would need for the video ahead of time, then assembled and animated them into a sequence, entirely in Nuke.

Again and again, I would merge a new graphic asset onto my shot, and I would have to do some math to figure out how to transform it into the center of the frame. Since the origin (0,0) of a Nuke frame is the bottom left corner, by default, images show up in the lower left of the frame rather than the center. Which is not what I want.

So, I'd add a Transform to the asset and move it to the center of the 1920 x 1080 frame. Since I care about precision, I didn't just eyeball the transform. I want it to be exact.

As long as I add a Transform to a graphic element with the upstream node selected, the Transform will detect the width and height of the asset and place the transform jack in the center of the object. As a Nuke user, you already knew that.

Then, I place my cursor in the x translate parameter box and type 1920/2 - whatever value was in the x center position, as determined by the upstream node. I repeat this process for the y translate parameter, using 1080/2 to match the frame's height.

And lo, we have discovered another simple, math-based operation, prone to human error, ripe for automation. The formula is simple:

  • The x translate parameter should be defined as half the frame width minus half the asset width.
  • The y translate parameter should be defined as half the frame height minus half the asset height.
  • If we have added the Translate node directly to the asset — which is to say we have not added it to our script unconnected — the x center and y center parameters will be automatically filled with the half-width and half-height values of our asset.

In Nuke Python, this formula would be expressed as:

n = nuke.thisNode()

# Get the x and y values of the Transform's center point
xVal = n['center'].value(0)
yVal = n['center'].value(1)

# Get the width and height of the frame format
rVal = nuke.Root()
xfVal = rVal.width()
yfVal = rVal.height()

# Define the variables to set the translate values
txVal = n['translate'].value(0)
tyVal = n['translate'].value(1)

# Find difference between center of frame and center of transform
cxVal = xfVal/2-xVal
cyVal = yfVal/2-yVal

# Translate to center of frame format
n['translate'].setValue(cxVal, 0)
n['translate'].setValue(cyVal, 1)

Next, we take that nicely formatted Python script and shove it into an addOnUserCreate function within our Menu.py file thusly:

def OnTransformCreate():
  nTR = nuke.thisNode()
  if nTR != None:
    script="n = nuke.thisNode(); xVal = n['center'].value(0); yVal = n['center'].value(1); rVal = nuke.Root(); xfVal = rVal.width(); yfVal = rVal.height(); txVal = n['translate'].value(0); tyVal = n['translate'].value(1); cxVal = xfVal/2-xVal; cyVal = yfVal/2-yVal; n['translate'].setValue(cxVal, 0); n['translate'].setValue(cyVal, 1);"
    k = nuke.PyScript_Knob('center_trans', 'Center Transform')
    k.setCommand(script)
    nTR.addKnob(k)

nuke.addOnUserCreate(OnTransformCreate, nodeClass="Transform")

Now, every Transform node created will have a nice big "Center Transform" button added to it automatically.

So, when I bring in a 584 x 1024 graphic asset like, say, this:

And I merge it over a 1920 x 1080 background...

...add a Transform node — which will find the center point to be (292,512)

All I have to do to center my graphic asset is click this button...

...and boom. Automated.

Update – 2020-04-20

Back in January, reader Birger sent me an email explaining his method for centering non-root-sized images over a background.

He writes:

For me, the easiest way would be to put a reformat (1920x1080) underneath the asset and set resize type to none. Would that work for you too?

As I replied to Birger, this will definitely accomplish the same thing once you tick the "black outside" checkbox. Additionally, the Reformat node concatenates just like the Transform node, so if you need to stack transforms, you wont lose any quality due to filtering.

The only arguments I can make for using my version over a Reformat node are:

  1. I like to see a Transform node on the node graph when I'm repositioning things because it helps me understand what's happening at a glance.

  2. When I'm working, I often put down a Transform node before I know I need something centered, so it's easier for me to just click the "Center" button.

  3. In the event that I want to start with a centered image and then move it slightly off-center, I can use the same node, center the object, then move from there. But I probably wouldn't do that since I can add an additional Transform after the Center operation and the nodes would concatenate into a single Transform operation, so this one isn't really valid.

Anyway, thanks Birger for the additional solution!.

Smarter, More Flexible Viewer Frame Handles

The best thing about posting my amateur, hacky Nuke scripts on this blog is that you, the handsome readers of this site, are often much smarter than I am, and frequently write in with enhancements or improvements to my scripts.

Such was the case, recently, with my Automated Viewer Frame Handles script. Reader and Visual Effects Supervisor Sean Danischevsky sent me this:

def set_viewer_handles(head_handles, tail_handles):
  #from https://doingthatwrong.com/
  # set in and out points of viewer to script range minus handle frames
  # Get the node that is the current viewer
  v = nuke.activeViewer().node()
  # Get the first and last frames from the project settings
  firstFrame = nuke.Root()['first_frame'].value()
  lastFrame = nuke.Root()['last_frame'].value()
  # get a string for the new range and set this on the viewer
  newRange = str(int(firstFrame)+head_handles) + '-' + str(int(lastFrame) - tail_handles)
  v['frame_range_lock'].setValue(True)
  v['frame_range'].setValue(newRange)


# Add the commands to the Viewer Menu
nuke.menu('Nuke').addCommand('Viewer/Viewer Handles - 16f',
"set_viewer_handles(16, 16)")
nuke.menu('Nuke').addCommand('Viewer/Viewer Handles - 12f',
"set_viewer_handles(12, 12)")
nuke.menu('Nuke').addCommand('Viewer/Viewer Handles - 10f',
"set_viewer_handles(10, 10)")
nuke.menu('Nuke').addCommand('Viewer/Viewer Handles - 8f',
"set_viewer_handles(8, 8)")

In my original script, I had hard-coded the frame handle length into the function, and created duplicate functions for each of my different handle lengths. Sean, being much better at this than I am, created a single function that takes a handle length input from the function call. In his version, all that's required to add an alternative frame handle length to the menu options is to duplicate the line that adds the menu command, and change the handle length that's sent to the function. Sean also added the ability to set different head and tail handle lengths to the script.

In thanking Sean for sending me this improved version of the script, I mentioned that it seemed that he'd set up the function in a way that would make it easy to prompt users to input a handle length, should they require a custom handle that wasn't already in their menu options. To which he replied with this:

def set_viewer_range(head_handles= 10, tail_handles= 10, ask= False):
    # set in and out points of viewer to script range minus handle frames
    # from https://doingthatwrong.com/
    # with some tweaks by Sean Danischevsky 2017
    if ask:
        p= nuke.Panel('Set Viewer Handles')
        p.addSingleLineInput('Head', head_handles)
        p.addSingleLineInput('Tail', tail_handles)
        #show the panel
        ret = p.show()
        if ret:
            head_handles= p.value('Head')
            tail_handles= p.value('Tail')
        else:
            return

    #only positive integers, please
    head_handles= max(0, int(head_handles))
    tail_handles= max(0, int(tail_handles))

    # Get the node that is the current viewer
    v = nuke.activeViewer().node()

    # Get the first and last frames from the project settings
    firstFrame = nuke.Root()['first_frame'].value()
    lastFrame = nuke.Root()['last_frame'].value()

    # get a string for the new range and set this on the viewer
    newRange = str(int(firstFrame)+ head_handles) + '-' + str(int(lastFrame) - tail_handles)
    v['frame_range_lock'].setValue(True)
    v['frame_range'].setValue(newRange)


# Add the commands to the Viewer Menu
nuke.menu('Nuke').addCommand('Viewer/Viewer Handles - 16f',
"set_viewer_range(16, 16)")
nuke.menu('Nuke').addCommand('Viewer/Viewer Handles - 12f',
"set_viewer_range(12, 12)")
nuke.menu('Nuke').addCommand('Viewer/Viewer Handles - 10f',
"set_viewer_range(10, 10)")
nuke.menu('Nuke').addCommand('Viewer/Viewer Handles - 8f',
"set_viewer_range(8, 8)")
nuke.menu('Nuke').addCommand('Viewer/Viewer Handles - ask',
"set_viewer_range(ask= True)")

Now, in addition to the set, common handle lengths in the menu, there's now an option to prompt the user for input. The pop-up is pre-filled with a value of 10, something that can be customized, as well. It's a thing of beauty.

I'd like to thank Sean for sending me both of these scripts. He took my ugly, half-formed idea, simplified it and made it more flexible. I've already begun using his script in place of mine, and I suggest you do the same.

Nuke: Copy with Expressions

So, here's a thing I made.

I was recently doing some motion graphics work in Nuke, as I do. I had several elements in a shot that I needed to animate-on with the same motion, speed, size, etc.

The graphics were already in their "final" positions, having done a full layout before animating. Now, I just wanted to add an animated Transform to each element. And I wanted to be able to easily adjust them all, together, as I finessed the animation.

But I couldn't just Clone a Transform and paste it into the other branches. The problem being that none of the elements shared the same Anchor Point (Center). If I cloned the Transform, all of the graphics would be scaling from the center of the first element, not their own centers.

I needed a handful of Transforms that were linked by all of their parameters except Center.

So, rather than spending 15 minutes writing and copy/pasting expressions to link all of the various knobs on the Transform nodes, I spent an hour writing a Python tool that will do it with a keyboard shortcut.

def CopyWithExp():
  sourceNode = nuke.selectedNode().name()
  nuke.nodeCopy("%clipboard%")
  nuke.nodePaste("%clipboard%")
  destNode = nuke.selectedNode().name()
  for i in nuke.selectedNodes():
      for j in i.knobs():
          i[j].setExpression( sourceNode + '.' + j )
      i['xpos'].setExpression('')
      i['ypos'].setExpression('')
      i['selected'].setExpression('')
      i['channels'].setExpression( sourceNode + '.channels' )


nuke.menu('Nuke').addCommand('Edit/Copy with Expressions', "CopyWithExp()", "^#C")

(This goes in your Menu.py file in your ./nuke directory.)

Now, when I press ⌥+⌘+C, it will duplicate the selected node, and link every knob with an expression. Essentially a DIY Clone, but with the ability to easily "declone" individual parameters by right clicking on the parameter and selecting Set to default.

What's Up With That Extra Junk In The For Loop?

It wouldn't be a homemade tool if it didn't include some hacky code to fix some unexpected results. As it turns out, when you programmatically link every knob from one node to another, you also end up linking the hidden knobs that are not exposed to the user in the GUI. Which is not always good.

In the for loop above, you'll see that, after linking every knob between the old and new nodes, I'm reverting the parameters for xpos, ypos, and selected. These parameters are the x and y position of the node on the node graph, and whether or not the node has been selected.

For obvious reasons, we'd like the ability to select the nodes individually. And, if we don't unlink the x and y positions of the nodes, the new node will be permanently affixed atop the old node. You won't even be able to see the original node. Not super helpful.

I've also "manually" linked the channels knob. For some reason, it was not expression linking correctly on its own. It would end up linked to the channel knob, which is a different thing entirely. So, rather than figuring out why it wasn't working, I lazily fixed it with an extra line of code.

Does It Work With Nodes That Aren't Transform Nodes?

Yes, it does. But you may discover a node that has a parameter that breaks in the duplication, like the channels knob did in the Transforms. If/when you find a broken knob, you can add it to the "whitelist" of parameters at the end of the for loop and so on, and so on.

If you'd like to do some exploring, you can see a full list of the knobs associated with a node by firing up Nuke's Script Editor and running the following command while the node is selected:

for i in nuke.selectedNode().knobs():
    print i

Ugh. Are There Any Other Limitations?

There totally are.

Being that the new nodes created are linked via expressions, copying the nodes into a new Nuke project will result in the same error message one would see copying any expression linked node into a new script. It will complain that it can't find the source node that the expressions are looking for. Even if you copy the source node with the expression linked nodes, it will throw an error, then, when you dismiss the error message, the nodes will work. Nuke.

Also, the nuke.nodeCopy("%clipboard%") and nuke.nodePaste("%clipboard%") commands in the Python script use the system clipboard to duplicate the node. This isn't different than using the normal system copy and paste tools in Nuke, but some of you out there use weird clipboard utilities that do things I can't predict. So. There's not much I can do for you there.

Anyway

This tools comes from a conversation I had with friend-of-the-blog, and my podcast co-host, Joe Steel. I was complaining about this problem (and others) in our Slack channel, and he mentioned that Katana had a Copy with Expressions command that would do what I was asking.

I'm actually surprised this feature isn't already built in to Nuke, but now, thanks to Joe, all of our Expression-Linked Dreams have come true.

Customizing Native Nuke Nodes with addOnCreate

As much as I enjoy building custom gizmos to make my work in Nuke more enjoyable, they're really no replacement for native nodes that (hopefully, eventually) include the tweaked feature that I want.

In fact, trying to use a custom gizmo as a replacement for a native node can add friction since I end up with two results in my tab+search window rather than one. When trying to use my beloved FrameHold gizmo, I end up adding the old, dumb, native FrameHold node about half of the time. It's partly because there are two FrameHold nodes in my results, and partly because my custom gizmo shows up lower in the search results than than the native node. Sure, I could rename my gizmo to something unique to avoid ambiguity in the search, but that would come at the cost of precious muscle memory.

framehold tab search.png

But, thanks to an email from reader Patrick, I've recently become aware of the addOnCreate command in Nuke's Python API. Essentially, addOnCreate allows you to define a function to be run whenever a given Class of node is added, opening the door to customizing the native Nuke nodes as they're added to your script.

As a quick test, I used addOnCreate to add some TCL code to the labels of my TimeOffset and Tracker nodes.

# Time Offset Label Modification

def OnTimeOffsetCreate():
  nTO = nuke.thisNode()
  if nTO != None:
    label = nTO['label'].value()
    nTO['label'].setValue('[value time_offset]')

# Tracker Label Modification

def OnTrackerCreate():
  nTR = nuke.thisNode()
  if nTR != None:
    label = nTR['label'].value()
    nTR['label'].setValue('[value transform]\n[value reference_frame]')

# Add the custom labels to newly created nodes

nuke.addOnCreate(OnTimeOffsetCreate, nodeClass="TimeOffset")
nuke.addOnCreate(OnTrackerCreate, nodeClass="Tracker4")

(code only)

I've long been a fan of using the label of my TimeOffset nodes to show me how many frames have been offset. Especially handy for my kind of work, where a single animated element can be reused dozens times, offset in time, and randomized to make large animations easier to create and manage. For Tracker nodes, it's important to keep track of both the Reference Frame used, as well as the type of Transform being applied. Now, every time I add a TimeOffset or Tracker node, the additional information is automatically added to my node label.

Nuke default nodes on top. With custom labels below.

Nuke default nodes on top. With custom labels below.

As expected, there are limits to what you can modify with the Python API but, henceforth, this method of interface customization is going to be my preference, resorting to creating gizmos as a fall-back when I run into a limitation. The thought of dropping a single Menu.py file into my local .nuke directory, and having all my Nuke customizations show up, is incredibly appealing to me.

Node Sets for Nuke v1.1

Since creating the Node Sets for Nuke toolset back in June, I've been using it like crazy on all of my projects. Which has led to the discovery of one incredibly obnoxious bug.

This little guy is the maxPanels property at the top of the Properties Pane:

maxPanels.png

This is where you set the maximum number of node properties panels that can be open simultaneously. I usually keep mine set to 3 or 4. When I open a node's properties panel, if I already have the maximum number of panels open, the oldest panel, at the bottom of the list, is closed and the new panel opens on top. Which is great.

Unless, of course, you're trying to simultaneously open an unknown number of properties panels, all at the same time.

When using the Node Sets tool for showing all nodes in a set, I would have to manually set the maxPanels number to a value greater than or equal to the number of nodes I'd already tagged, prior to running the command. Since I usually have no idea how many nodes are in a set, I end up setting the maxPanels property to something I know is way too high, like 35. That way, when the Show Nodes in Set function runs, I won't be left looking at only 3 of my tagged nodes.

But since the Show Nodes in Set command is already searching through all the nodes to see which ones are tagged, wouldn't it be great if it could keep a tally as it searches and automatically update the maxPanels property to match?

Yes. That would be nice.

# Node Sets for Nuke v1.1

# This function opens the control panels of
# all the nodes with "inNodeSet" on their label

def showOnlyChosenNodes():
  names = []
  li = []
  for node in nuke.allNodes():
    if "inNodeSet" in node['label'].value():
      names.extend([node.name()])
      li.extend([node])
  numPan = nuke.toNode('preferences')['maxPanels']
  numPan.setValue(len(names))
  for i in range(len(li)):
    node = li[i]
    node.showControlPanel()

# This function adds "inNodeSet" to a
# new line on the label of all the selected nodes

def labelNodes():
  for node in nuke.selectedNodes():
    label = node['label'].value()
    if 'inNodeSet' not in label:
      node['label'].setValue( label +  '\ninNodeSet')


# and this one clears the label of
# all the selected nodes

def unLabelNodes():
  for node in nuke.selectedNodes():
    label = node['label'].value()
    if 'inNodeSet' in label:
      node['label'].setValue( label.replace('\ninNodeSet','') )


toolbar = nuke.menu("Nodes")
nsets = toolbar.addMenu("Node Sets")
nsets.addCommand('Node Set: Show Nodes', 'showOnlyChosenNodes()')
nsets.addCommand('Node Set: Add Selected', 'labelNodes()')
nsets.addCommand('Node Set: Remove Selected', 'unLabelNodes()')

In addition to updating the showOnlyChosenNodes() function, I've also renamed the actual menu commands to all start with Node Set:. This way, I can start a tab+search with the same three letters, nod, and quickly narrow results to the only 3 tools that fit that criteria; my Node Set tools.

node sets tab search

I love using Node Sets in Nuke and I'm glad to finally be rid of this annoying workaround.

Automated Viewer Frame Handles in Nuke

When working on a VFX shot, more often than not, the plate's image sequence will include frame handles; an additional 8 or 12 frames at the start and end of the shot. The extra half or third of a second at the ends of the shot give us the flexibility to adjust in and out points later without having to come back to our compositing application and re-render the shot with a new frame range. Which is great.

But, when working on a shot in, say, Nuke, you'll often want to play back the shot without viewing the currently-extraneous frames. Lucky for us, Nuke has a these fun little red triangles on its timeline that you can drag around to set custom in and out points as you see fit. It's a great feature for focusing on a smaller range of frames for a specific task.

But, if you're trying to see eactly the frames that are currently in the edit, and only those frames, dragging around tiny red triangles isn't terribly precise. And the other option, typing in the first frame plus the handle, a hyphen, then the last frame minus the handle, is slow and requires math (yuck).

This being a well-defined, menial, and repetitive task, it's a perfect candidate for automation. With help, again, from my good friend Jake at The Foundry Support, I've added two new items to the bottom of my Viewer menu.

Now, all it takes is a single click (or keyboard shortcut, if you're so inclined) to quickly add 12 or 8 frame handles to my Viewer Timeline Range.

Here's the code to add to your Menu.py file in your .nuke folder:

def newViewerRange12():
  # Get the node that is the current viewer
  v = nuke.activeViewer().node()
  # Get the first and last frames from the project settings
  firstFrame = nuke.Root()['first_frame'].value()
  lastFrame = nuke.Root()['last_frame'].value()
  # get a string for the new range and set this on the viewer
  newRange = str(int(firstFrame)+12) + '-' + str(int(lastFrame) - 12)
  v['frame_range_lock'].setValue(True)
  v['frame_range'].setValue(newRange)


def newViewerRange8():
  # Get the node that is the current viewer
  v = nuke.activeViewer().node()
  # Get the first and last frames from the project settings
  firstFrame = nuke.Root()['first_frame'].value()
  lastFrame = nuke.Root()['last_frame'].value()
  # get a string for the new range and set this on the viewer
  newRange = str(int(firstFrame)+8) + '-' + str(int(lastFrame) - 8)
  v['frame_range_lock'].setValue(True)
  v['frame_range'].setValue(newRange)

# Add the commands to the Viewer Menu
nuke.menu('Nuke').addCommand('Viewer/Viewer Handles - 12f',
"newViewerRange12()")
nuke.menu('Nuke').addCommand('Viewer/Viewer Handles - 8f',
"newViewerRange8()")

Naturally, if you only ever deal with one duration for your frame handles, you can add just one of the functions, but I like having the flexibility of both options.

That Jake, he sure is good with the Python code, isn't he?

Update - 2014-10-25

The release of Nuke 9 is just around the corner and its revamped Viewer interface brings with it a small bug in my Viewer Frame Handles code (allegedly).

Design decisions in Nuke's new big brother, Nuke Studio, have made their way into the standalone app (reportedly) and now require the Frame Range Lock to be set before the new Frame Range is defined (or so I hear). Keen observers will notice that the last 2 lines of the newViewerRange functions above have been swapped to reflect this change.

According to a friend who's not me, the old code will still work in Nuke 9, but requires you to have existing In and Out points prior to running the command or run the command twice.

If you're planning on using this tool with Nuke 9 and Nuke Studio, you should update your Menu.py file now. The updated code will run properly in both Nuke 8 and Nuke 9 (so the story goes).

Node Sets in Nuke

UPDATE: A newer version of this plugin exists here.

The story goes like this. It may sound familiar.

You're working on an animation in your favorite node-based compositing application, and you want to make a timing change. The first half of the animation is perfect, but it should hold a little longer before it finishes, to better match the background plate.

Problem is, you've got animated nodes all over your script, and all of their keyframes need to move in sync. Transform nodes, Grade nodes, GridWarp nodes.

You zoom in and move around your script, looking for nodes with the little red "A" in the upper right corner.

No, not that node. That one's for that other asset and it doesn't need to move.

Okay, got 'em all open? Now switch the the Dope Sheet, grab everything after frame 75 and slide it to the right a few frames. Done?

Let's watch the new timing.

Shit. Forgot one.

Which one?

Oh, here it is. Wait. How many frames did the other 6 nodes move?

Sigh.

CMD+Z. CMD+Z. CMD+Z. CMD+Z. CMD+Z. CMD+Z.

Okay, are they all open this time? Good. Now slide them all together.

Done? Let's watch it.

Better.

10 Minutes And 20 Additional Nodes Later.

Well...now I need a little less time between frames 30 and 42.

Dammit.

Feature Request

This is the annoying scenario I found myself repeating about a dozen times on a recent project, so I sent an email to The Foundry's support team, requesting the addition of a feature I described as "Node Sets".

A Node Set is an arbitrary collection of nodes that can be opened all at once with a single command. New nodes can be added as the script grows, or removed if they're no longer needed.

Along with my feature request, I provided these two screenshots to help explain:

What I received back from Jake, my new best friend at The Foundry Support, was the following script:

# This function opens the control panels of
# all the nodes with "inNodeSet" on their label

def showOnlyChosenNodes():
  for node in nuke.allNodes():
    if "inNodeSet" in node['label'].value():
      print node.name()
      node.showControlPanel()
    else:
      node.hideControlPanel()

# This function adds "inNodeSet" to a
# new line on the label of all the selected nodes

def labelNodes():
  for node in nuke.selectedNodes():
    label = node['label'].value()
    if 'inNodeSet' not in label:
      node['label'].setValue( label +  '\ninNodeSet')

# This function clears the label of
# all the selected nodes

def unLabelNodes():
  for node in nuke.selectedNodes():
    label = node['label'].value()
    if 'inNodeSet' in label:
      node['label'].setValue( label.replace('\ninNodeSet','') )

# These commands create a new menu item with
# entries for the functions above

nuke.menu('Nuke').addCommand('Node Sets/Show Nodes in Set', "showOnlyChosenNodes()")
nuke.menu('Nuke').addCommand('Node Sets/Add Selected Nodes to Set', "labelNodes()")
nuke.menu('Nuke').addCommand('Node Sets/Remove Selected Nodes from Set', "unLabelNodes()")

For those of you who don't speak Python, allow me explain what's happening here. Once added to your Menu.py file, the script creates 3 tools in a new menu within Nuke.

Just as I requested, I have the ability to add or remove selected nodes from the group, then, when I need to make a change, open all of those nodes with a single command.

Magic.

Not Magic

What the script is actually doing is tagging the nodes. No, Nuke did not suddenly or secretly gain the ability to add tags to things, it's cleverly using the label section in the Node tab to hold the inNodeSet text. The Show Nodes in Set command simply scans all the nodes in your script for nodes with inNodeSet in their labels, and opens them. Simple. Smart.

As a result, yes, you can add the inNodeSet text to the label field manually, rather than using the new menu command, and the Show Nodes in Set command will find it, but who would want to do such a barbarous thing?

Customization

As with all commands in Nuke, a keyboard shortcut can be added to these commands to make the process even quicker. But, since I don't particularly enjoy cluttering up my menu bar with unnecessary menus, nor do I enjoy having more keyboard shortcuts than I can remember (I totally already do), I opted to move the commands into the Nodes menu. This is easily done by swapping the last 3 lines of Jake's script with these lines:

toolbar = nuke.menu("Nodes")
nsets = toolbar.addMenu("Node Sets")
nsets.addCommand('Show Nodes in Set', 'showOnlyChosenNodes()')
nsets.addCommand('Add Selected Nodes to Set', 'labelNodes()')
nsets.addCommand('Remove Selected Nodes from Set', 'unLabelNodes()')

Here's where my tools now live.

I do this for one major reason; having these tools available in the Tab + Search tool. For those unfamiliar, Nuke has a built in tool similar to Spotlight or LaunchBar that allows you to press Tab then type the name of the tool you're looking for, avoiding the need to have keyboard shortcuts for every type of node.

Current Limitations

This being a bit of a hack, there are naturally a few limitations. First and foremost, using this tool will delete anything you already had in the label field of a node. I doesn't support the ability to add a tag to the text in the label field. The tag has to be the only thing in the label field.

Secondly, once you realize how useful this is, you may want to have more than one Node Set at your disposal. The good news about this current limitation is that you can very easily create as many node sets as you want by duplicating the code and changing the inNodeSet tag to something like inNodeSet2.

Of course, with multiple node sets, it'd be ideal if you could include a given node in multiple sets at the same time, but like I mentioned, this is not a real tagging system. If real tagging ever makes its way into the application, I imagine such a thing will then be possible.

Update - 2014-06-25

I emailed my pal Jake again, telling him how much I appreciate his work on this script, and you'll never guess what he did. He sent me an updated version of the script that adds the tag to the node label without overwriting the current text in the field.

Not only is this great for general usability, it means we can add a node to multiple Node Sets at the same time. We now have a real tagging system built into Nuke. How great is Jake? Seriously.

One thing I will note; if you are planning on using multiple Node Sets, you'll want to change the default tag to inNodeSet1. If you leave it as inNodeSet, it will also show up in results for other tags, like inNodeSet2.

Attribution

If it wasn't clear before, all credit for this script goes to The Foundry and their awesome support team. They continue to be one of my favorite companies, specifically because they offer great support in addition to their great products.

I'm incredibly happy to have this annoyance removed from my workflow, and I hope you are too.

Creating Unique Footnotes with MultiMarkdown Metadata

Footnotes. Writers love ’em. But if you’re not paying proper attention when creating them, you can quickly make a mess of your website or blog. In fact, until very recently, this site had broken footnote links all over the place. I’m going to pretend like none of you noticed, and tell you about how I fixed the problem, gently glossing over my past stupidity.

Each post on this site starts as a MultiMarkdown document in Sublime Text 2. When it’s complete, I preview it in Marked, then copy the HTML code and paste it into a new Squarespace post.

The Problem

Thing is, since I’m creating the post locally on my Mac, with no reference to the site as a whole, Marked has no way of knowing which footnote IDs have already been used, and which have not. Therefore each post labels its first footnote fn:1 and subsequent footnotes increase by 1, as you’d expect. The problem occurs when viewing the home page that shows 10 posts on a single page, each with their own fn:1. When you click on the [1] link in the body text, where do you think it’s going to take you? That’s right, to the first footnote it finds with the label fn:1, regardless of which post it was intended to link to [1].

Now, Marked has a setting in its preference pane called Use Random Footnote IDs which is used “to avoid conflicts when multiple documents are displayed on the web.” So this is already a solved problem, right? Probably, but there’s a part of my brain that feels uneasy about using randomly generated IDs. I’m sure using this feature would solve my problem and everything would be fine, but since I’m a nut, I want to control exactly how these unique footnotes are created.

Enter MultiMarkdown. MultiMarkdown includes a number of enhancements to the original Markdown syntax [2], including support for customizable metadata fields [3]. So, I created a custom metadata key called footnote:. Here’s what my boilerplate MultiMarkdown header looks like [4] :

Title:            
Author:         Dan Sturm      
Date:           %snippet:ddate%  
Marked Style:   ds_doc  
footnote:         

Now, whatever keyword I choose to add after the footnote: label will show up in the HTML header as [5].

Make With The Magic

The next thing I needed was a script to scan the HTML for the metadata key, and add it to all the footnote IDs, turning fn:1 into fn:my-footnote-key1.

import sys  
import re  
import subprocess


#   Open the file and convert it to searchable text  

fileText = open (sys.argv[1], "r+")  
searchText = fileText.read()


#   Pull the MultiMarkdown metadata key from the header  

mmdkey = re.search("(?<=\"footnote\" content=\")(.*)(?=\"/>)", searchText, re   .I)  
mmdkey = mmdkey.group()


#   Create the new footnote IDs  

fnnew = ("fn:", mmdkey)  
fnrefnew = ("fnref:", mmdkey)  

fnnew = "".join(fnnew)  
fnrefnew = "".join(fnrefnew)


#   Swap the footnote IDs for the new ones  

fnfix = re.sub("(fn:)", fnnew, searchText)  
fnreffix = re.sub("(fnref:)", fnrefnew, fnfix)


#   Strip HTML Header and Body tags. Copy the result to Clipboard  

def setClipboardData(data):  
  p = subprocess.Popen(['pbcopy'], stdin=subprocess.PIPE)  
  p.stdin.write(data)  
  p.stdin.close()  
  retcode = p.wait()  

fixStripped = re.sub("(?s).*(\n)\n", "", fnreffix)  
fixStripped = re.sub("(?s)\n\n\n().*", "", fixStripped)  
setClipboardData(fixStripped)


#   Write the updated code to the same file  

# fileText.seek(0)  
# fileText.write(fnreffix)  
# fileText.truncate()  
# fileText.close()  

Click here to download the script.

Now that we have that out of the way, let’s talk about how to actually use this code. I’m using a Hazel [6] rule pointed at a folder called Create Unique Footnotes. It looks like this:

The Hazel Rule

Simply put, it watches the folder for a new file and, when it sees one, it runs the script, displays a confirmation message, then trashes the now-unnecessary file, leaving the cleaned up, new code on the clipboard for easy pasting into your CMS of choice. So, when I like what I see in Marked and I’m ready to post, I hit CMD+S and save the HTML file to my Create Unique Footnotes folder, head over to my site, and hit CMD+V into a new post.

A Small Rabbit Hole

There are a few specific things I want to point out, just to make sure we’re clear.

The new HTML code is copied to the clipboard by the Python script, not by the Hazel rule. My workflow involves pasting HTML code into Squarespace, not uploading an HTML file and, since my MultiMarkdown file is the master copy of the post, that’s why I’m deleting the HTML file after running the script.

The HTML file being used as input for the script is a complete HTML document with a header, body tags, the whole shebang. I don’t need those extra bits when I’m pasting the code into Squarespace, so the Python script removes them before placing the code on the clipboard. In fact, the code on the clipboard looks exactly like what you see when you toggle the Switch to HTML Source View button in Marked [7] while previewing your MultiMarkdown document.

Another important note; keen observers will notice the last four lines of the Python script are commented out. That code is there for people who actually want a fully processed HTML document with fixed footnote IDs. Un-commenting-out [8] those four lines will write the fixed code over the original HTML document, while maintaining the header, et cetera. If you plan on using this workflow, you’ll want to remove the step in the Hazel rule that throws away the HTML document. I’d suggest you change that part of the rule to move the new HTML file to the Desktop as a sort of visual confirmation that the file has been updated.

I Believe Some Recognition is in Order

When I initially conceived of this idea I hadn’t the slightest idea how to best go about tackling it. I am not a programmer in any sense of the word. A Twitter conversation with my pal Sid O’Neill revealed that REGEX is the method by which I could find and replace items in the code. I don’t know how to do that, so…

Patterns is a Mac app for creating Regular Expressions that I’ve heard a number of people compliment in the past. It lets you see a live preview of the current pattern matches and, when you’ve got the selection you want, will generate the appropriate code for you; Python in my case. Completely indispensable and only $2.99.

Next, of course I have to thank Stack Overflow from whence I acquired some REGEX knowledge and code. Patterns comes with a great Reference Sheet for REGEX commands, but some of the descriptions still left me befuddled. Stack Overflow also linked me to…

This article by Gabe at Macdrifter, where I got the code that places the HTML on the clipboard. It was exactly what I needed, so I took it. And I would have gotten away with it if it wasn’t for you pesky kids and…nevermind.

In any case, high-fives all around. Go team.


  1. Some of what I’m describing is obfuscated by the use of Bigfoot for my footnotes, specifically the numeral for each footnote, but the problem remains. Let’s move on.  ↩

  2. Like footnotes, for one.  ↩

  3. You can learn all about MultiMarkdown Metadata here.  ↩

  4. Always invoked via TextExpander.  ↩

  5. Obviously, I need to choose a unique key for each post or this whole exercise is pointless.  ↩

  6. You do use Hazel, don’t you? Good.  ↩

  7. It’s in the upper right corner of your document, next to the fullscreen button.  ↩

  8. That’s so not a word, is it?  ↩

My Custom Nuke Defaults

After a few busy months of post work, I finally found a few days to reevaluate and improve my workflows and system preferences. Since I spend a majority of my time in NukeX, that’s where I decided to start.

I’ve got some new custom tools I built recently that I’ll share with you soon enough, but first things first, Nuke’s default state needed a little adjusting. Here are the items I added to my init.py [1] file that save me tons of time and headache.

init.py:

# Project Settings > Default format: HD 1920x1080  
nuke.knobDefault("Root.format", "HD")  

# Viewer Settings > Optimize viewer during playback: on  
nuke.knobDefault("Viewer.freezeGuiWhenPlayBack", "1")  

# Write > Default for EXR files: 16bit Half, No Compression  
nuke.knobDefault("Write.exr.compression","0")  

# Exposure Tool > Use stops instead of densities  
nuke.knobDefault("EXPTool.mode", "0")  

# Text > Default font: Helvetica Regular (in Dropbox folder)  
nuke.knobDefault("Text.font",   "/Path/to/Dropbox/fonts/HelveticaRegular.   ttf")  

# StickyNote > default text size: 40pt  
nuke.knobDefault("StickyNote.note_font_size", "40")  

# RotoPaint > Set default tool to brush, set default lifetime for brush and clone to "all frames"  
nuke.knobDefault("RotoPaint.toolbox", "brush {{brush ltt 0} {clone ltt 0}}")  

Explain Yourself

Since I don’t work in feature film VFX, the HD frame size is a no-brainer.

I do a fair amount of motion graphics animation in Nuke, so I often have the Curve Editor open. I’ve always been frustrated that Nuke never seems to be able to achieve realtime playback when looking at curves, so I ended up making adjustments, then switching back to the Node Graph to view my changes. Very annoying. The recently added “Optimize viewer during playback” button was the answer to my realtime problems [2]. Like all of these custom preferences, I use it so often, I want it to be on by default.

I comp almost exclusively in Open EXR image sequences. For me, 16bit Half Float with No Compression is the appropriate balance of file size and quality. By default, the Write node sets compression to Zip (1 scaneline) and it annoys the crap out of me to change it every time.

I love to use the Exposure tool, especially when color-correcting Log footage by hand [3]. But since I’m a filmmaker and a human being, I prefer to adjust exposure in Stops rather than Densities.

I set the Text node to use Helvetica by default and I keep the font in my Dropbox folder to make sure it’s always with me. Why? Because the default is normally Arial and seriously, are you kidding me?

I love using StickyNote nodes to write myself notes as I’m working. But because either my screen resolution is too high or I’m getting old and going blind [4], I always have to crank up the font size to read the damn things.

When I decide to use a RotoPaint node instead of a simple Roto node, it’s because I want to paint something. And more often than not, I want to paint or clone something for the entire duration of the shot, rather than just a single frame. Boom. Default.

What Else?

I would love to set the default feathering falloff in the Roto and RotoPaint nodes to smooth rather than linear, but I haven’t been able to figure out how to make that happen as of yet.

If you’d like to use these preferences in your Nuke setup, simply copy and paste the code into your init.py file in your .nuke directory. If you don’t have an init.py file in there, just open a text editor and make one.

Happy comping.

UPDATE – September 09, 2013, 04:55:04PM

As Joe Rosensteel pointed out on Twitter, another great tip is changing your 3D control type to Maya controls. I’m not a Maya user myself, but nearly all the 3D artists I work with are, and nothing makes them happier to help you out than saying, “Would you like to take stab at it? You know the 3D controls are the same as Maya’s”. And the 3D control type preference is super easy to adjust. It’s part of the GUI in the application preferences pane, under the Viewers tab.


  1. If you were unaware, you can modify Nuke’s default state by creating a file called init.py in your .nuke directory. The application loads your preferences on launch and it’s easy enough to add/remove settings without screwing up your install. More info on page 18 of the Nuke User Guide  ↩

  2. I don’t remember exactly which version introduced it, but it’s the button that looks like a snowflake to the left of the playback controls.  ↩

  3. Yes, I’m familiar with the concept of LUTs.  ↩

  4. Rhetroical.  ↩